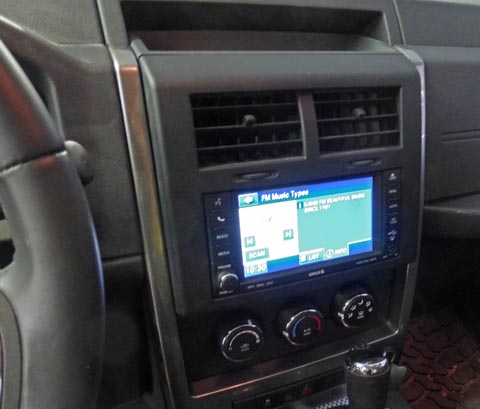
This is my Jeep "MyGig" radio as I received it from the factory.
I neglected to take any pictures as I was removing the radio and installing the harness, so
these next 3 pictures are from an instructional video on the makers website.

The trim frame around the radio just pulls off. When you are finished, it then snaps back into place.
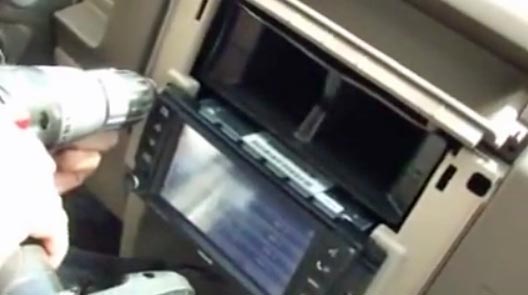
The radio can be pulled by removing 4 screws.
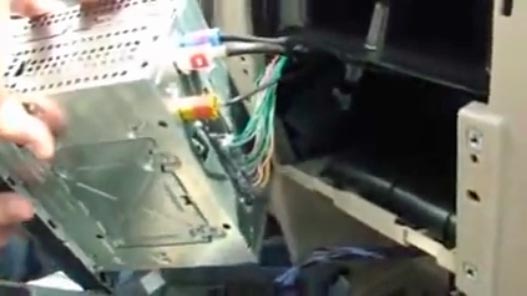
The back of the radio has two large rectangular connectors. Mine, like the one pictured, only had
one cable plugged in. You remove these connectors and replace them with ones on the harness.
The connectors you removed then plug into additional connectors on the harness. That's all there
is to connecting it. There are no wires to cut or splice. You can later remove the system with
no trace it was there.

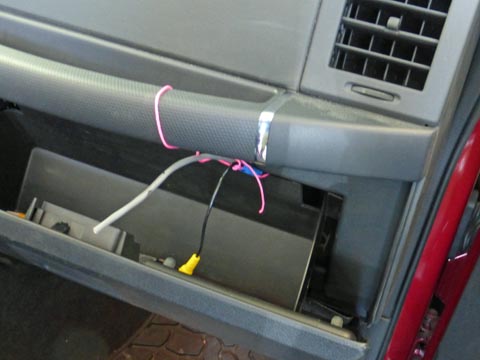
I routed the harness through an access hole into the area behind the glove compartment.
The Lockpick is velcro'd to a panel overhead, and the harness is temporarily tied out
of the way. I have easy access to this area by simply depressing tabs on the side of the
glove compartment door, then swinging it all the way down (and dumping all the contents
if I am not careful).
After completing the module
install, I
checked it out using one of my available security cameras, as my new
cameras have not yet arrived. All the functions seem to be
working just fine. Since this unit has the provisions for a
front
camera, I plan to add that also. I am interested in seeing if
it
helps indicate how much space I am leaving in front of my car and
showing my clearance as I swing into tight
parking spots.
Rear Wiring
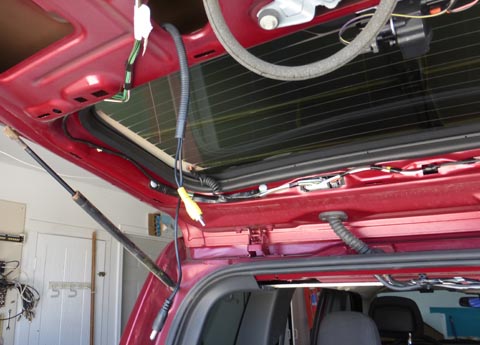
Next, since I really want to be able to manually control my cameras, I need to run the wiring for the cameras. I have not been looking forward to this job. I did find that most of the trim panels I need to get behind or under just un-snap, using a number of steel clips into holes in the body. Sometimes there are 1 or 2 screws, and in most cases none. I started in the back removing the trim panel from the hatchback, then removing or loosening the top trim strip in the rear, the right rear quarter panel, and the door bottom trim strips running up the passenger side of the car. These two were the most difficult.
Rear Wiring
Next, since I really want to be able to manually control my cameras, I need to run the wiring for the cameras. I have not been looking forward to this job. I did find that most of the trim panels I need to get behind or under just un-snap, using a number of steel clips into holes in the body. Sometimes there are 1 or 2 screws, and in most cases none. I started in the back removing the trim panel from the hatchback, then removing or loosening the top trim strip in the rear, the right rear quarter panel, and the door bottom trim strips running up the passenger side of the car. These two were the most difficult.
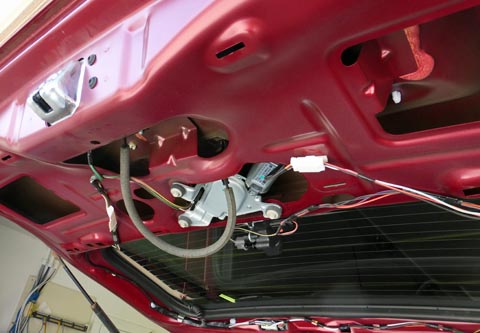
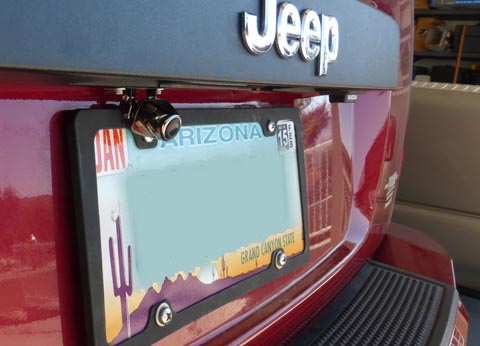
The trim on the inside of the hatchback came off by removing two screws, then just pulling the panel off. This exposed the area where
I need to run the wiring around the window to above the license plate, where the camera will mount.
Using my fiberglass wire-pulling rods, some solid electrical wire, and a length of nylon line, I finally managed to run the wires all the way from under the dashboard to the top of the hatchback opening. I even managed to get all the trim strips and panels back together again.
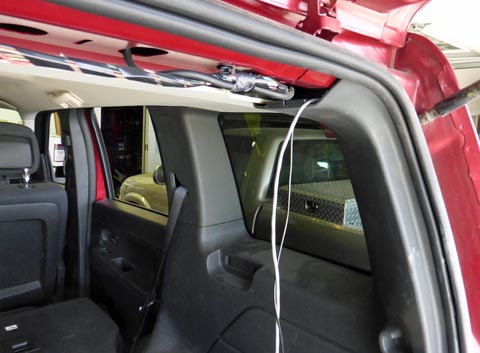
The wires now run from under the dashboard, behind the glove compartment, down along the bottom side of the passenger area to the rear
quarter panel, up to the rear corner post and to the top of the hatchback. I still need to route them across the top, through a flexible
wiring tube, around the window and to the center of the door, where the camera wires will come through.
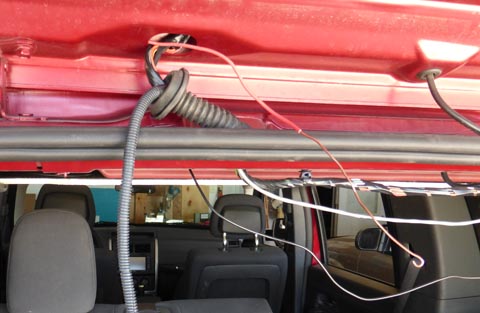
There is a corrugated rubber tube which protects the wires running between the
movable lift gate and the body. I was finally able to get my new wiring through
that tube. The RCA plug on the video cable was a real bear, but I finally got it.
The power cable was easy. As the video cable I was supplied was several feet
too short, I used a coupler right at the entrance to the rubber tube. The cable I
ran from there was just about the right length. I made the power cable just a
little bit longer. They now run to the correct spot to plug in the camera. I used
wire loom to protect the wires in the hatchback.
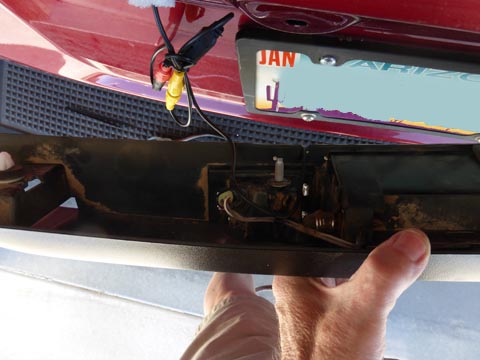
With the wire tube properly re-attached to the sheet metal the wire running task is just about complete. I used a couple pieces of foam to
"clamp" the harness in position. There were no good places to zip tie them.
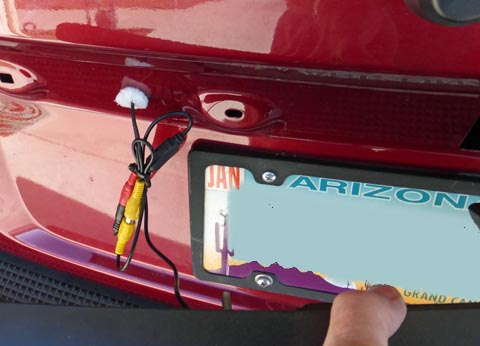
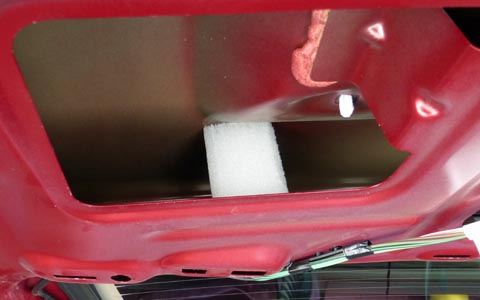
I drilled a 5/8 diameter hole in the skin and ran the wiring through it. I used a piece
of foam to seal, hold, and protect the wires.
The housing where I mounted the camera has plenty of room for the excess wiring.
The camera I selected is a low cost CCD based camera. The CCD sensors have better low light sensitivity and
somewhat better pictures than the cheaper CMOS ones, although the price and quality differences seem to both be
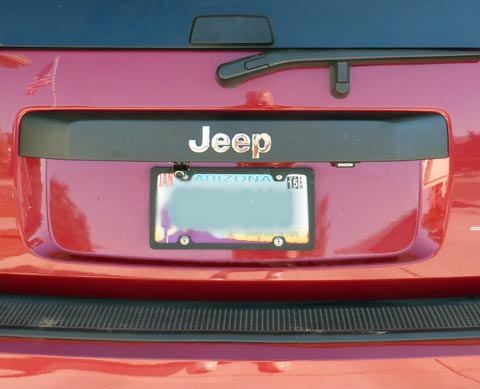
growing smaller. The side and rear views show how unobtrusive the camera is.
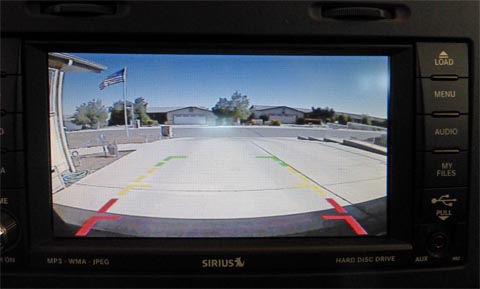
The view the camera provides is bright and clear. The guide lines help a lot when
backing near obstacles. The right angles on the red lines are about 2 feet
behind the car, the end of the red is about 4. The camera has such a wide angle
lens that it tends to "fish eye" the image. The diagonal field of view is almost 170
degrees, the horizontal is about 120 degrees. This view shows a couple of
reflections on the screen that I don't see at my normal viewing angle.
I am very impressed with the accuracy of the guide lines. Today I drove on the road
with the left side of the car right up to the lane line, then I did the same for the
right side. In both cases, the guide lines were parallel with, and right on the lane lines
behind me. This tells me that when I am backing, the car will just occupy the area
shown by the guide lines.
This camera does not have infrared LEDs for night time viewing, but the backup lights of
the car seem to provide adequate illumination for at least 10 to 15 feet. Any streetlights
or parking lot lights in the area will only make it better.
Front
View Camera
Since the interface supports a front view camera, I decided to try it. One of the cameras I bought (the most expensive one at about $24) is a universal application camera. There are three extra wires in the camera harness, red, white, and blue. I thought that was appropriate for the upcoming Independence Day holiday. If none of the wires are connected, the image is non-reversed, and there are no guide lines. Connecting the red and blue wires reverses the image for rear view applications, and connecting the red and white shows the guide lines. Of course connecting all three gives you both a reversed image and guide lines. For this application, I don't have any of the three connected, as I want a non-reversed image for looking forward, and I didn't want any guide lines.
Installation was very straight forward. The hardest part of running the wires was getting them from under the passenger side dashboard to the driver side. There is almost no open space in the center, but I managed to snake a length of 12 gauge solid house wire through and then I pulled the wires. They then go through a large solid rubber grommet through the firewall. I discovered a great way to pass wires through something like this. Usually I can get the wires through the rubber, only to have them tangle and bend trying to get through the insulation and the fiber panel under the dash. This time I used a short length of 1/4 inch copper tubing. It is stiff enough to easily work it through the grommet and the insulation, well into the open area under the dash. I then feed the wire I am running through the tubing until it shows on the other end, then I pull the copper on through, leaving the wire in place.
I ran the wires from behind the glove compartment where all my other connections have been made, across under the dash to the very left end of the firewall, where the grommet is, through and along the left fender line under the hood to the front of the car, down alongside the radiator to the bottom grill, and across to my camera location. It would have been much simpler to just pass the wires through the firewall on the passenger side to the front and down. Unfortunately, the heater core, the air conditioning and the various ducts totally cover the part of the firewall I have access to, so I went the long way around.
As I have no idea how practical this camera will prove to be, I attached the camera with some Scotch double sided foam tape. If I don't like it, I can remove it with no extra holes in the bumper area.
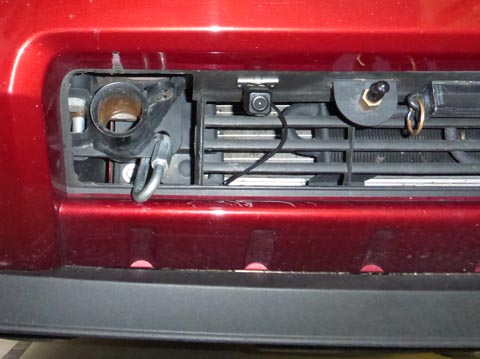
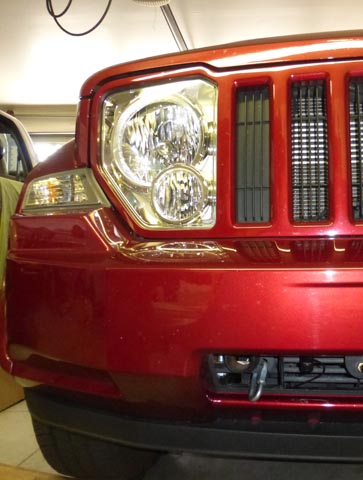
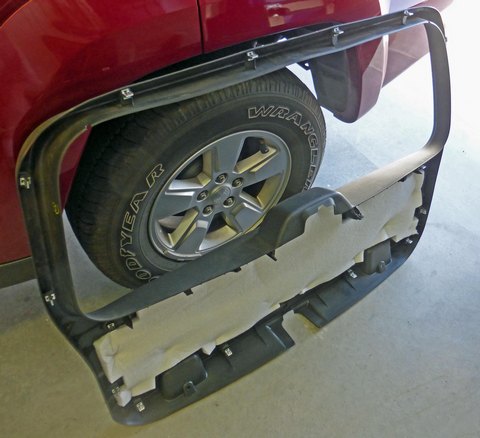
I mounted the camera on the ledge above the bottom grill, alongside all the accessories for towing the car. You can see the
camera in the left picture between the tow cable loop and the tow brake air fitting. The right picture doesn't really show the
camera well, but it helps put the left picture in perspective.
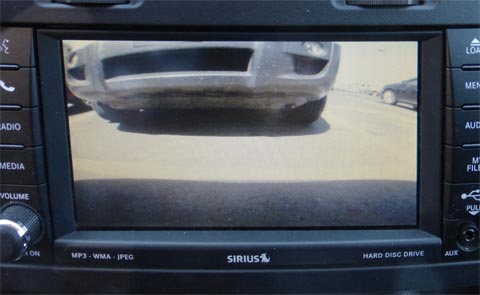
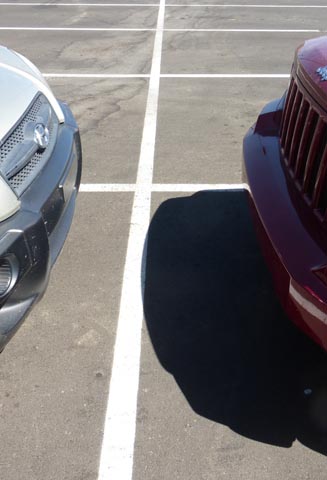
This is the image produced by the front camera, as I sit in a parking lot. Is that car really frowning at me? The view is from a
very low perspective. The side view shows my actual distance from the other car. The shadow across the bottom shows
how close the camera sees to the front bumper as it extends well into the monitor.
I may find this camera useful, but I also may not.
Since the interface supports a front view camera, I decided to try it. One of the cameras I bought (the most expensive one at about $24) is a universal application camera. There are three extra wires in the camera harness, red, white, and blue. I thought that was appropriate for the upcoming Independence Day holiday. If none of the wires are connected, the image is non-reversed, and there are no guide lines. Connecting the red and blue wires reverses the image for rear view applications, and connecting the red and white shows the guide lines. Of course connecting all three gives you both a reversed image and guide lines. For this application, I don't have any of the three connected, as I want a non-reversed image for looking forward, and I didn't want any guide lines.
Installation was very straight forward. The hardest part of running the wires was getting them from under the passenger side dashboard to the driver side. There is almost no open space in the center, but I managed to snake a length of 12 gauge solid house wire through and then I pulled the wires. They then go through a large solid rubber grommet through the firewall. I discovered a great way to pass wires through something like this. Usually I can get the wires through the rubber, only to have them tangle and bend trying to get through the insulation and the fiber panel under the dash. This time I used a short length of 1/4 inch copper tubing. It is stiff enough to easily work it through the grommet and the insulation, well into the open area under the dash. I then feed the wire I am running through the tubing until it shows on the other end, then I pull the copper on through, leaving the wire in place.
I ran the wires from behind the glove compartment where all my other connections have been made, across under the dash to the very left end of the firewall, where the grommet is, through and along the left fender line under the hood to the front of the car, down alongside the radiator to the bottom grill, and across to my camera location. It would have been much simpler to just pass the wires through the firewall on the passenger side to the front and down. Unfortunately, the heater core, the air conditioning and the various ducts totally cover the part of the firewall I have access to, so I went the long way around.
As I have no idea how practical this camera will prove to be, I attached the camera with some Scotch double sided foam tape. If I don't like it, I can remove it with no extra holes in the bumper area.
I mounted the camera on the ledge above the bottom grill, alongside all the accessories for towing the car. You can see the
camera in the left picture between the tow cable loop and the tow brake air fitting. The right picture doesn't really show the
camera well, but it helps put the left picture in perspective.
This is the image produced by the front camera, as I sit in a parking lot. Is that car really frowning at me? The view is from a
very low perspective. The side view shows my actual distance from the other car. The shadow across the bottom shows
how close the camera sees to the front bumper as it extends well into the monitor.
I may find this camera useful, but I also may not.
Conclusions:
The backup camera is WONDERFUL! It gives me a clear image of the area behind me and even shows just what part of that area I will be in when I back up. I am totally pleased with it and have received just the results I was hoping for.
The natural rear visibility of this car is very poor, and as a result since the day I bought it I have been very concerned whenever I am backing up. With the limited direct visibility, I was constantly turning to look directly, then back to all 3 mirrors and backing very slowly and nervously. Now I still do all the checking, but with the image from the camera I can confidently back up and know exactly where the car is heading and just how close I am to any obstacles.
I think the forward facing camera is a waste! I can see no socially redeeming value to that camera where it is currently mounted. The ability to tell just how close I am to a car or other object in front is very subjective, and it does not show the correct view to verify that I will clear an adjacent car as I swing into a tight parking space; in fact it misleads you by making the car look much farther away than it really is, About the only advantage I see using this camera is I can pull my front bumper up to a line on the ground quite accurately. Other than that, I cannot really see a use for it, and that small advantage does not offset the distraction of the camera turning on whenever I slow to 7 MPH. I may try alternate locations to see if there is any value, but I will remove the camera from its present location.
11/5/14 OK, I have revised my opinion of the front camera.. Although it is not nearly as useful as the backup camera, I think I will keep it. It doesn't do what I originally wanted it for, but it does give me visibility for anything low and close to the front of my car that I cannot see directly, such as a child, an animal, a toy or tool, a rock, or any other low item which might be injured or damaged, or which might damage my car. I have found myself relying on this camera much more than I had anticipated or even than I thought I would after my initial use of it.
<BACK>
R. S. Mason
6/24/14