Solar Power Meter Cameras
8/17/13 The Meter-cam
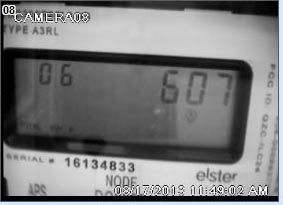
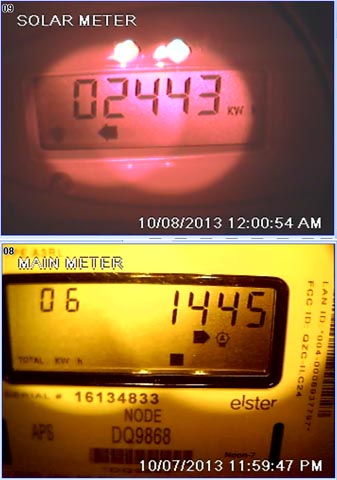
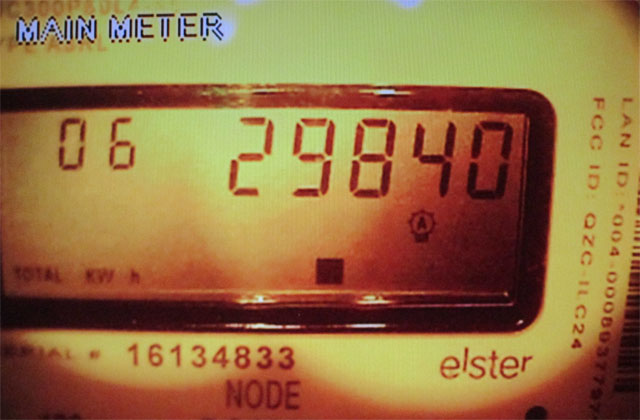
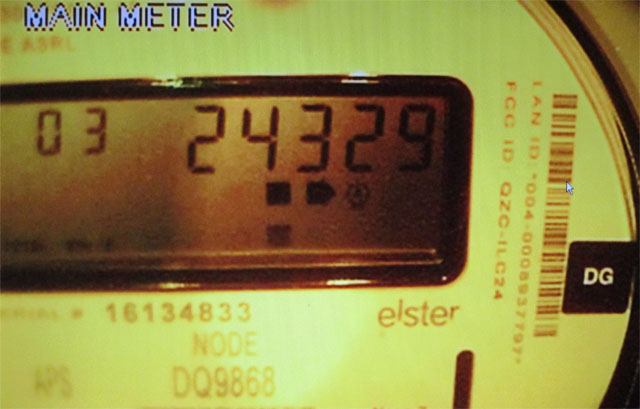
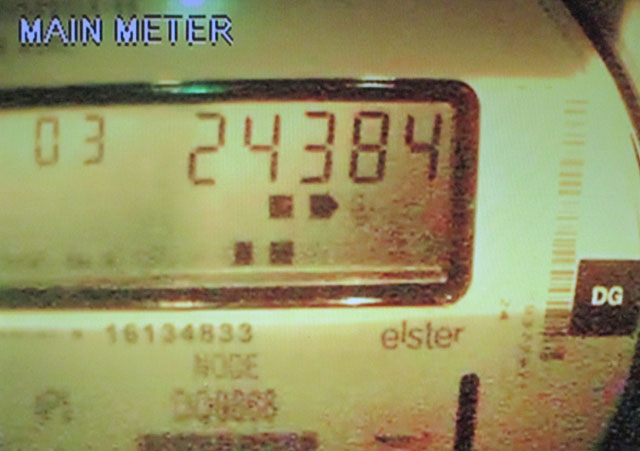
During these initial days and weeks of operation, I am trying to read my electric meter fairly frequently to keep track of my system's performance. As these meters are "smart meters", they read out a number of factors. The solar meter displays 7 different values, holding each one for about 5 seconds, but the only reading I really care about is the total kWh produced. The main meter works similarly, except it lists a total of 11 different items. The two I am interested in on this meter are screen #3, the total kWh APS supplied me, and screen #6, the total kWh I supplied APS.
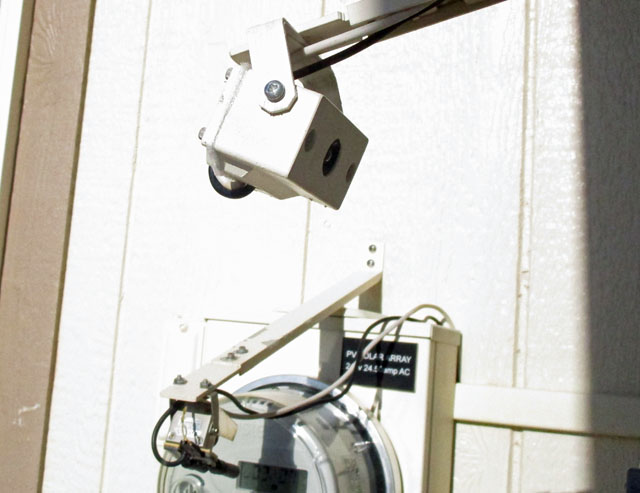
I decided to mount my small camera from the Stick-cam on my main meter to let me read the values from that meter.
I made a short aluminum post that would hold the camera about 4 or 5 inches from the meter. Using double sticky foam tape, I fastened it to my electrical box. I then connected it to a spare channel of my security camera system.
Now I can sit at my desk and read various displays, specifically the two most important ones, energy in and energy out. No longer do I have to stand outside waiting for the meters to scroll around to the readings I want. It works great!
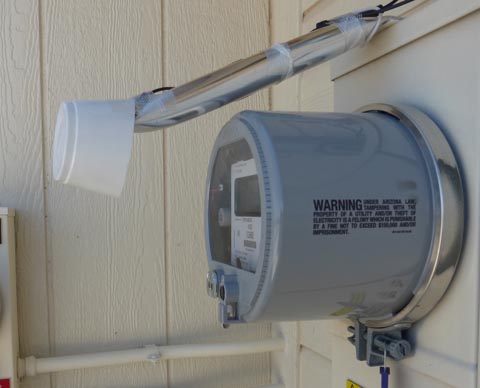
The camera hangs over the front of the meter for a good view. This whole setup is temporary, and will be removed after I have obtained enough data to
thoroughly understand the relationships between the meter readings, the online data, and my bills. The readings from this meter currently are my only
indication of the power I send back to APS. I hope to establish a reasonable method of approximating this value without needing the actual meter readings.
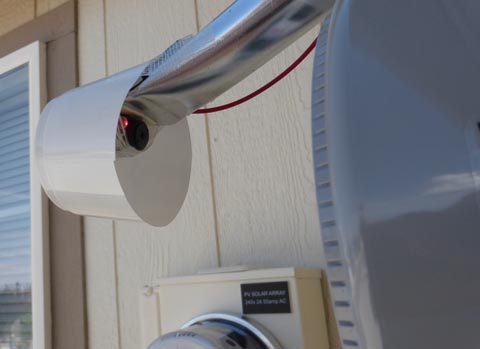
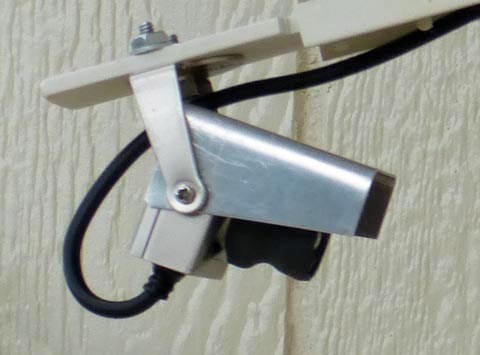
The center picture shows the camera itself. It is not rated for outdoor use, so I made a small weather cover for it. (Any similarity between it and a cut-off
plastic drinking cup is purely coincidental!) I also included an LED to hopefully be able to see after dark. That didn't work. I replaced the single red
LED with two white ones. Now it works fine, but is very bright at night. It is crude, but it is temporary!
On the right is the image produced by this setup. It is in black and white, but that's fine.
Inserted Sunday September 1
Meter-Cam Rev. 2
OK, I have concluded that I just don't have enough information to determine my usage solely from my power manager data and what APS posts online. If they would post daily credit like they do their charges then I would have it. As a result I decided to re-do my meter-cam as the original one was really ugly! I picked up a couple of small used color cameras from Ebay cheap (2 for $25), and decided with minimal effort I could make them waterproof. I just finished making a much less obtrusive mount and installed it. While I was at it, I made another one for the solar meter. I think this could be a permanent installation if I decide it is of continuing interest. If not, everything removes with just some minor caulking and painting of the holes. I'm sure glad I ran a couple of spare wires when I installed my security system. Maybe I should have run more!
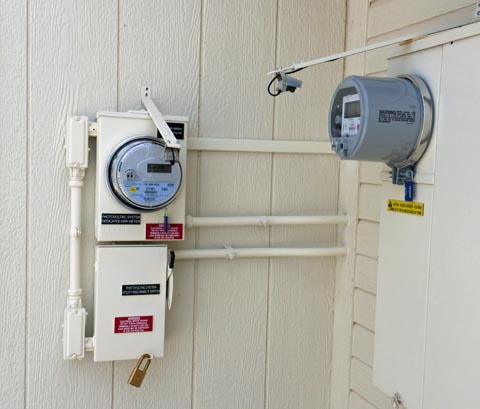
These small cameras were pretty much water tight as manufactured. I added a sealant between the machined housing and the
rear cover, and added shrink sleeving to prevent water wicking up the lens threads. I also made a simple aluminum rain shield
for each one to keep moisture away from the cameras in the first place. These cameras were ideal from the fact that the lenses
are manually adjustable. I was able to easily focus them to 4 1/2 inches for a sharp focus on the meters.
A couple lengths of a plastic wire trough hide my wire runs and finish it up nicely.
Meter-Cam Rev. 2
OK, I have concluded that I just don't have enough information to determine my usage solely from my power manager data and what APS posts online. If they would post daily credit like they do their charges then I would have it. As a result I decided to re-do my meter-cam as the original one was really ugly! I picked up a couple of small used color cameras from Ebay cheap (2 for $25), and decided with minimal effort I could make them waterproof. I just finished making a much less obtrusive mount and installed it. While I was at it, I made another one for the solar meter. I think this could be a permanent installation if I decide it is of continuing interest. If not, everything removes with just some minor caulking and painting of the holes. I'm sure glad I ran a couple of spare wires when I installed my security system. Maybe I should have run more!
These small cameras were pretty much water tight as manufactured. I added a sealant between the machined housing and the
rear cover, and added shrink sleeving to prevent water wicking up the lens threads. I also made a simple aluminum rain shield
for each one to keep moisture away from the cameras in the first place. These cameras were ideal from the fact that the lenses
are manually adjustable. I was able to easily focus them to 4 1/2 inches for a sharp focus on the meters.
A couple lengths of a plastic wire trough hide my wire runs and finish it up nicely.
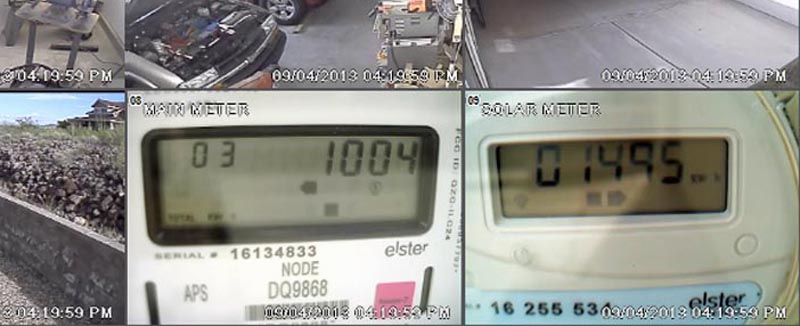
This partial view from my security
system shows the additional pictures from the meter-cams. The main meter is currently showing screen 3 which
is kWh APS has supplied to me, and the solar meter is showing total kWh generated by my solar system. It is very nice that the security system
I bought has 16 camera inputs! I am currently only using 7 of the 8 cameras it came with, but the expandability is great. I have now set it to record
these 2 camera from 5:00 PM to 5:05 PM every day. I can now get the readings at the same time each day with ease. I should do this at midnight
each night, but I didn't include illumination on these cameras. (yet!)
October 5, 2013
Meter-cam Lights
OK, so I decided I wanted to take my readings at midnight, the same time as APS takes theirs, therefore I need illumination. I initially thought I would use infrared LEDs so there would be no visible illumination. In preliminary tests, the cameras picked up the image of the meter just fine, but the LCD numbers were totally invisible. I double checked this effect with several LCD devices, all with the same result. I then quickly tried red, green, blue, orange, and white LEDs. Red produced very readable numbers, and seemed to be the least obnoxious.
I did some tests using LEDs I have collected over the years, with very poor results. Most LEDs have a very narrow angle and are designed more to be seen than to illuminate, and they often have a very uneven pattern when used as a light source. I bought several types of LEDs from Ebay and evaluated their illumination properties. I found some high power (1/2 watt) 8mm diameter red LEDs with a uniform wide angle dispersion that looked to be ideal. They proved to have more than adequate power and a very even light pattern. I made two assemblies consisting of two LEDs in series mounted under the cameras. I am running them well below their power ratings and have connected them to an electronic timer so they only come on for slightly longer than the 5 minutes I am recording the images.
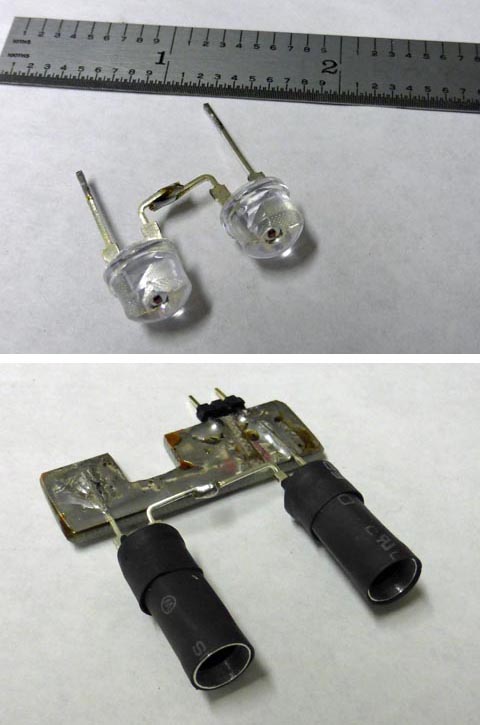
The upper picture on the left shows a pair of LEDs soldered together prior to mounting. Below are LEDs mounted to a small piece of PC board material on which I cut a
shallow groove to give me 2 conductors. The LED's on the bottom one are for the main meter, where I needed to separate the bulbs slightly to improve lighting on the very
right of the display. I use double sticky foam tape on the bottom of the circuit board (top when mounted) to fasten to the camera. The tubes extending out the front are to
confine the light to a small area of the meter. I used un-shrunk shrink sleeving for these tubes. They would not stay round at the end, so I inserted very thin wall aluminum rings
The center shows them installed on both cameras.
On the right are the views I get at night from these cameras. As to why two identical cameras lit with identical red LEDs give such
different colors, I have no idea! I did try a quick bench test using a similar camera, and as you would expect, the pinkish-red is the
color it showed. The main camera obviously has a defect in it, but I like the results!
Addition of April 2018
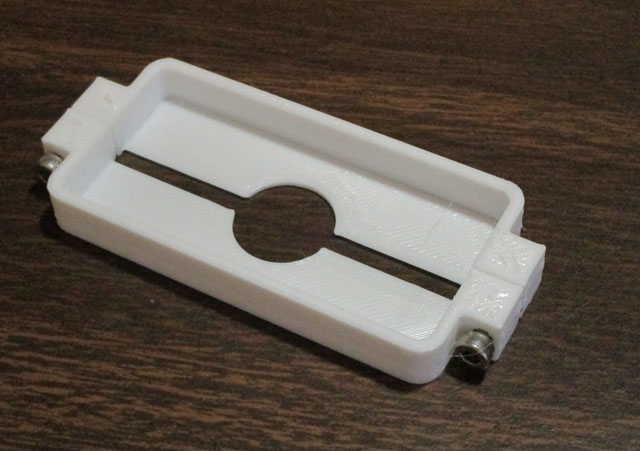
I have just received a 3D printer I had on order for about 2 1/2 months. During that waiting period I decided to design a housing to truly weather proof my cameras and clean up the ungainly LED structures hanging below them. I made it a box with a form fitting opening for the camera and its lens and included mounting for my 2 LEDs on either side of the camera. I also designed a mating lid and a hanging strap.
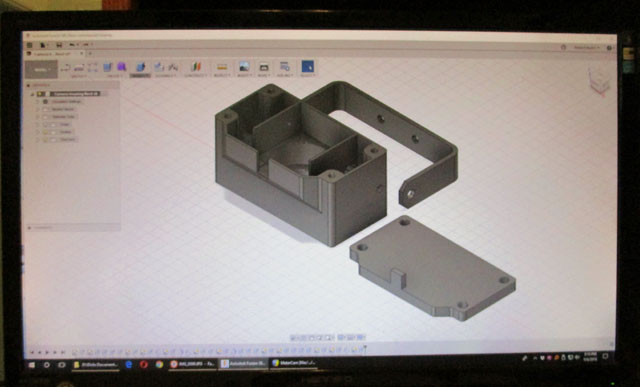
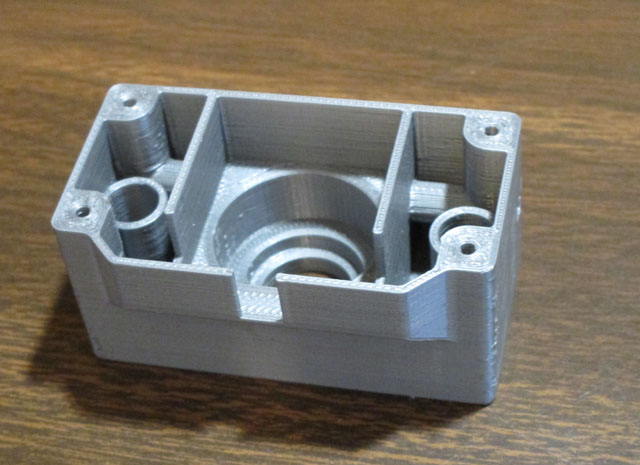
On the left is my design of the case on the Fusion 360 3D CAD program. The right shows the actual printed result. The square camera body fits snugly in the
square center section with the lens protruding to flush on the front. The two LEDs fit snugly in the tubes on both sides. The bulge on the bottom allows wiring
to enter the case and reach the LEDs as well as the camera.
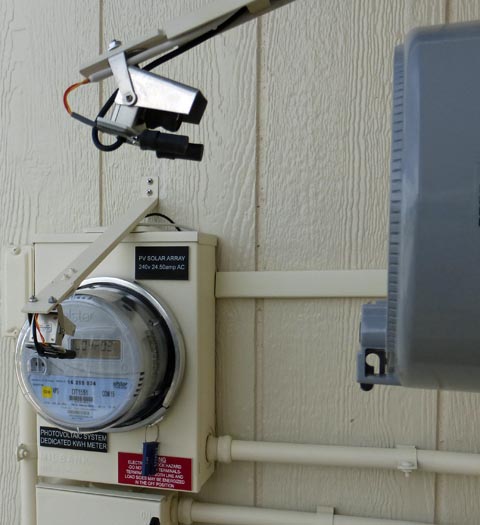
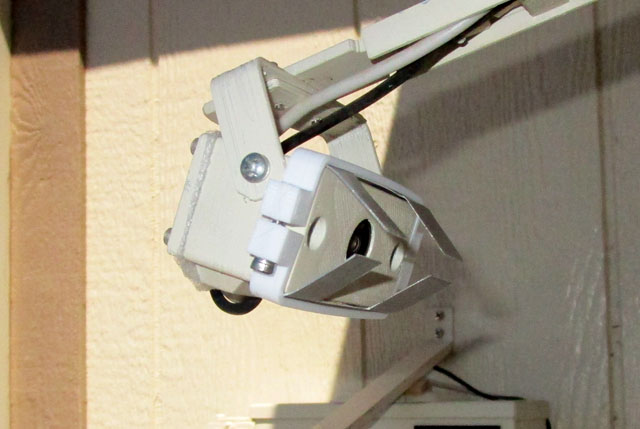
Here I have the main meter camera installed and mounted in the case. The plastic I used is good for outdoor
use, but is black in color. I didn't like the looks, so I painted it.
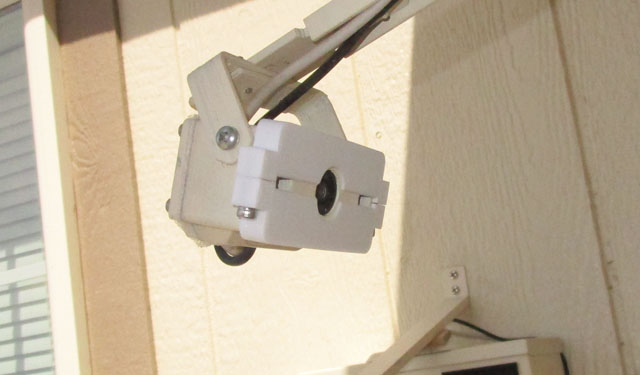
I have now mounted my 3D printed slots. I modified the clamps I used with the test rig
to include a flat plate over the front that covers part of the LED holes. Since the image
of the solar meter is fine, I did not really need to do this on that camera, but did so for good measure.
CLICK HERE TO RETURN TO MAIN PAGE
Meter-cam Lights
OK, so I decided I wanted to take my readings at midnight, the same time as APS takes theirs, therefore I need illumination. I initially thought I would use infrared LEDs so there would be no visible illumination. In preliminary tests, the cameras picked up the image of the meter just fine, but the LCD numbers were totally invisible. I double checked this effect with several LCD devices, all with the same result. I then quickly tried red, green, blue, orange, and white LEDs. Red produced very readable numbers, and seemed to be the least obnoxious.
I did some tests using LEDs I have collected over the years, with very poor results. Most LEDs have a very narrow angle and are designed more to be seen than to illuminate, and they often have a very uneven pattern when used as a light source. I bought several types of LEDs from Ebay and evaluated their illumination properties. I found some high power (1/2 watt) 8mm diameter red LEDs with a uniform wide angle dispersion that looked to be ideal. They proved to have more than adequate power and a very even light pattern. I made two assemblies consisting of two LEDs in series mounted under the cameras. I am running them well below their power ratings and have connected them to an electronic timer so they only come on for slightly longer than the 5 minutes I am recording the images.
The upper picture on the left shows a pair of LEDs soldered together prior to mounting. Below are LEDs mounted to a small piece of PC board material on which I cut a
shallow groove to give me 2 conductors. The LED's on the bottom one are for the main meter, where I needed to separate the bulbs slightly to improve lighting on the very
right of the display. I use double sticky foam tape on the bottom of the circuit board (top when mounted) to fasten to the camera. The tubes extending out the front are to
confine the light to a small area of the meter. I used un-shrunk shrink sleeving for these tubes. They would not stay round at the end, so I inserted very thin wall aluminum rings
The center shows them installed on both cameras.
On the right are the views I get at night from these cameras. As to why two identical cameras lit with identical red LEDs give such
different colors, I have no idea! I did try a quick bench test using a similar camera, and as you would expect, the pinkish-red is the
color it showed. The main camera obviously has a defect in it, but I like the results!
Addition of April 2018
I have just received a 3D printer I had on order for about 2 1/2 months. During that waiting period I decided to design a housing to truly weather proof my cameras and clean up the ungainly LED structures hanging below them. I made it a box with a form fitting opening for the camera and its lens and included mounting for my 2 LEDs on either side of the camera. I also designed a mating lid and a hanging strap.
On the left is my design of the case on the Fusion 360 3D CAD program. The right shows the actual printed result. The square camera body fits snugly in the
square center section with the lens protruding to flush on the front. The two LEDs fit snugly in the tubes on both sides. The bulge on the bottom allows wiring
to enter the case and reach the LEDs as well as the camera.
Here I have the main meter camera installed and mounted in the case. The plastic I used is good for outdoor
use, but is black in color. I didn't like the looks, so I painted it.
The illumination looked good, but
did not produce as good an image as the previous setup. The solar
meter was fine, but the right end of the main meter was quite
dark. This has been a continuing problem with this meter, but has
been acceptable before. Now I feel it is too dark to be reliable,
especially when visibility is reduced by rain drops on the meter.
I figured that the light was bright enough, but that the camera was
automatically darkening to even out the very bright face of the meter
around the digits. As an experiment I made some aluminum
tabs and mounted them on the camera. These could be bent up or down to
block the light. I adjusted them to limit most of the output to
just the numbers and the results were much better.
This is my test setup to see if limiting the light to the numbers improves the image.
I 3D printed the clamp that holds the aluminum.
The left shows my original setup with the two LEDs mounted below the camera. It is dark on the last couple digits, but not too bad. The center
is in the new case. The illuminated area is larger and the right digits are even darker. The right, with the shuttered light, is much more even
and quite readable.
Since this seemed to work well, I
modified the printed clamp I had used to hold the aluminum tabs to
include a flat plate across the front of the camera. This gives
the same narrowing effect as the aluminum tabs, but is much neater and
more durable.
I have now mounted my 3D printed slots. I modified the clamps I used with the test rig
to include a flat plate over the front that covers part of the LED holes. Since the image
of the solar meter is fine, I did not really need to do this on that camera, but did so for good measure.
CLICK HERE TO RETURN TO MAIN PAGE