Whole House Fan
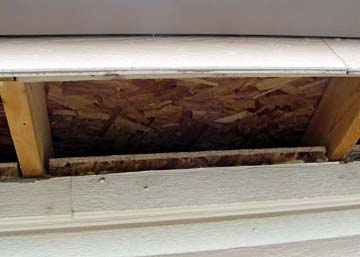
In our previous house, we had a large, 30 inch whole house fan. In the evenings we could open the windows, turn on the fan, and cooler outside air would be drawn into the house. This is much more efficient than strictly using air conditioning. When we moved into our new house in Prescott, our initial reaction was that we could not install a whole house fan, as there is no attic in the house. The ceilings are attached to the bottom of the roof trusses, and the roof is attached to the top of these trusses. The space in-between is filled with insulation. I finally realized that there is a small area over the utility room where the garage roof extends over the house roof. In this area I could mount a fan that pulls air from the utility room through the thickness of the roof trusses and blow it into the attic of the garage (Yes, there is an attic in the garage.). The largest problem was that there must be enough vent area from the attic to allow the air to escape without building up too much pressure. The fans I was looking at required about 4 square feet of vent area. The vents originally provided had an open area of between 1 and 1.5 square feet. I finally decided to do this project, and broke it into three separate parts. The first was to add additonal venting area to the garage attic. The second was to add a crawl hole near where the work would be done. The existing crawl hole is very small and clear across the garage. The third project was the actual installation of the fan. I decided to add the additional vents under the front eaves of the garage. I started by pulling the siding from the bottom of the eaves. After trimming the excess insulation, I fastened boards into each opening to hold the insulation down, insuring an adequate opening. I cut openings in the siding boards, covered them with hardware cloth, repainted it all, and re-installed them. The final result was the addition of over 4 square feet
of vents.
This alone is enough for the fan, plus I am now in a better position
for
natural convection to help keep the attic cooler during the days.
The second project was to cut a new attic access
hole. I cut a
large 30 x 36 opening and framed around it. It is located at
the
very edge of the garage very near where the fan would be installed.
The real effort was installing the fan itself. I did a lot of research into whole house fans. I quickly limited my search to several fans that had motor operated, insulated doors that close when the fan is off. This minimizes the amount of heat or cool air that is lost when the fan is off. I eventually narrowed the field down to the AirScape 1.7. This seems to be a very well engineered product, consisting of an aluminum box mounting four computer style fans, two on each end, and a pair of motorized doors in the bottom. It draws about half the power of competitive fans of the same output, and seems to be much quieter. I talked to the president of the company and was very impressed with his knowledge, and the approaches he took to solve problems the other companies were experiencing. I ordered the fan unit, but had to wait as there was about a two week backlog. During this time I thoroughly engineered the
installation and started
making sawdust.
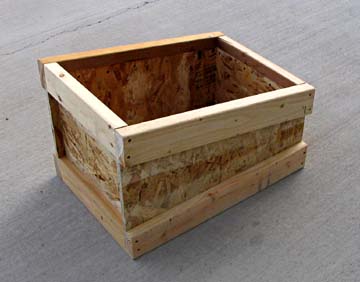
To mount the fan above the house roof level, I had to make a box structure to pass the air through the insulation filled space between the ceiling and the roof. After several other designs, I decided to frame the bottom and the top with 2 x 4s, and make the walls of the box of chipboard. Even though the factory said it was not necessary to mount the fan level, I decided that since I had to make the box anyway, I might as well design it so the fan is level. The hardest part of the whole job was gaining access to run my control wire. For this I cut about an 8 inch hole through the roof directly over the wall where the switch was to be located. Then lying flat with almost no overhead clearance, I reached down through almost 18 inches of insulation to the top of the wall below. I then drilled through the top of the wall for wire access. In this "drill by feel" mode, I had a lot of trouble aligning the drill. I managed to drill the first two holes through the top of the wall and right out through the living room wall. The third hole worked. Thank heavens for Fixall and drywall mud! I stripped the shingles off an area about 6 x 6 feet and removed a section of the roof sheeting several inches larger than the size of the box. I then framed within this opening to mount the box. The bottom of the box rests on the top of the ceiling drywall and extends up between two of the roof trusses to form a level surface above the house roof line. It is securely fastened to the top and bottom of one roof truss. Added framing along the front and rear edges completed the structure. I then patched around the installed box with pieces of the roof sheeting I had removed. I also re-mounted the existing electrical box somewhat
lower on the
roof.
Once the fan arrived, I was able to complete the
installation in a couple
of hours. All that was left upstairs was to install a line
cord to
the fan, set the fan in place over a gasket that came with the fan,
screw
it in place, and connect a 3 conductor control wire.
I cut out the ceiling drywall flush to the inside walls of the frame. I had already screwed the ceiling to the frame in a number of places before making this cut. Doing it in this order prevented the screws from breaking out the drywall edges. The grill installed with four screws, making for a very neat and attractive appearance. The switch installed in a few minutes, finishing the
installation.
I am very happy with the performance of this fan. It is quiet on low speed, and only a little louder on high speed. It moves the air quite well, creating a very noticable draft in front of an open window. For the last month or so I have been opening a window at each end of the house at night to try and help cool the house over night. The best this has done is to lower the interior temperature by 2 degrees. I have found that by partially opening windows in various rooms and running the fan overnight on low, I lower the house temperature by about 9 degrees (varies, of course, with the outside temperature). This not only makes the house much more comfortable for sleep, and in the morning, it also delays the starting time for the air conditioner during the day by several hours. I also found that by opening the door from the utility room to the garage, closing the door to the kitchen, and opening a window in my shop, that I can pull air through my shop and garage and fairly quickly cool them down by several degrees. These areas have no other means of cooling. I am very pleased with both the quality and the
performance of this
fan.
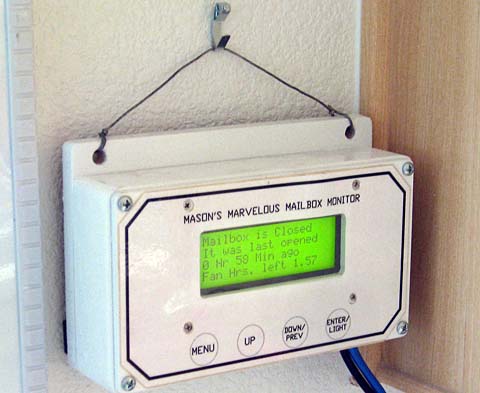
Update of 10/9/09 I updated my Mailbox Monitor system to add a fan timer function. Using this feature I can now set my whole house fan to run for up to 10 hours, in 15 minute increments. For details of this modification, please see my Mailbox Monitor writeup.
|
||||||||||||||||||||||
|
Dick
Mason, Prescott, AZ 8/16/06
|


 I w
I w


