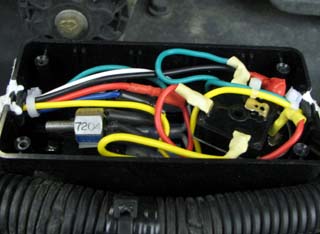
Tow Light Modifications, Tow Bar Mods, Tire Torquing ToolTow Car Wiring Before we took delivery of our Foretravel, we had the occasion to follow it while it was towing a small Chevy. I noticed the turn signals and stop lights on the tow car were quite dim, even though the ones on the motorhome were very bright.. After we took possession of the coach, I found the lights on our Saturn, and later our Honda were no brighter. I have been thinking about replacing the solid state light adapter with a relay box (you may have noticed that I like relays!). I always assumed the lack of brightness was caused by too many diode drops in the circuit. I have one diode in series with each lamp in the tow car and I didn’t know how many were in the adapter. One approach would have been to merely add relays to the output of the existing adapter, but after reviewing what really needed doing, it was just as easy to totally replace it. The function of the adapter is to control the turn signal lights on the towed vehicle. A turn signal input activates only the proper light, and the brake signal turns on both lights. The turn signals and brake lights are separate on the Foretravel, but are normally combined functions on trailers and towed cars. I designed a very simple circuit where each turn signal input pulls in a relay through a diode. The brake input has a diode feeding each relay. The contacts of the relay merely apply a full 12 volt signal to the tow car. OK, that was simple, but then I started getting other ideas. I don’t check my lights as often as I really should, as it is so hard to run into the motorhome to turn on a light and then run back to look at the toad lights. Why don’t I build in an easy to use light checker? After going through several ways to do this, I came up with the idea of a switch I can reach through the rear grill of the motorhome. This switch turns on the tail lights and flashes both turn signals using a built in flasher unit. I don’t need to check that the lights are not reversed as there have been no wiring changes after the initial testing, I only need to check that all the harness connections are good. I built the relay box with 2 relays, a turn signal flasher, and 3 full
wave diode bridges. I like to use bridges, but use only 2 of the
4 diodes. They are easy to package, are already partly wired, and
are usually well heat sinked (sunk?). These parts were a tight fit,
but did fit after several different arrangements. After completing
the box, I installed it wire for wire where the old adapter came out.
There were 2 new wires: a high current 12 volt line I ran from the battery
isolator through a 20 amp fuse, and the test wire which connects to the
test switch. The tail lights do not pass through the adapter, so
I wired one pole of the test switch to turn them on.
I took a hammer and chisel to the epoxy potting of the old adapter and found a fairly sophisticated circuit using a pair of power transistors to switch the lights. This really should have worked quite well with a minimum voltage drop. My conclusion is that the unit was faulty. My turn signal lights, which are also the brake lights, are now bright
and easy to see.
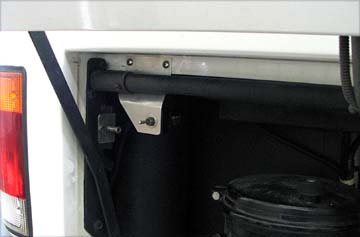
Added Tow Bar Clearance I use a Roadmaster Falcon towbar which mounts to the motorhome receiver. For when I am not towing, there is a ¼ inch thick tab on the bar with two holes, one of which pins through holes in a two plate bracket welded to the towbar base. This holds the bar in a horizontal position for storage. Unfortunately, with the bar in the storage position, the engine access door hits it as you start to open it. I notice that at Foretravel, the first thing the techs do before opening the rear door is to un-pin any tow bar and rest it on the floor. I made some measurements and found that I would only have to extend
one of the pinning holes about an inch for everything to clear. I
thought about simply welding an extension onto the tab or to the bracket,
but that sounded too much like work. I finally machined a simple
piece of ¼ inch steel with 3 holes in it. I bolted this to
the 2 holes in the towbar tab and use the third hole to pin it in place
in the bracket. This hinges the towbar slightly rearward and also
drops the end of the bar slightly due to the offset created by bolting
the piece to one side of the original tab.
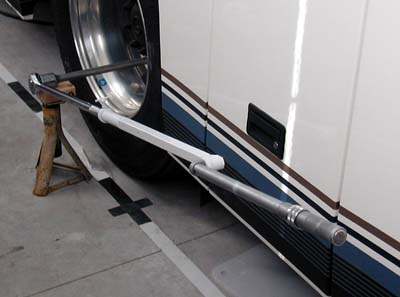
I can now open the engine compartment without doing anything to the towbar, and everything clears. Tire Lug Nut Torque Wrench The lug nuts on our Foretravel wheels require tightening to 450 to 500 pound feet. That’s a lot of torque! I had nothing that would allow me to remove a wheel (such as to service the air brakes) or even to verify the tightness of the lug nuts. (I have no intention of trying to change a tire on the road. In fact, I carry an unmounted tire as a spare, so if I should need it, I must have a mobile tire service truck mount it for me.) I looked at torque multipliers, which are a gear box which allow a low input torque to produce a large output torque. I could not see spending $600 or $700 for one of these! I also briefly considered buying a 1 inch impact wrench like the tire shops use. I gave up on this both because my current air compressor would not produce enough air to drive one, and because there is poor torque control with any of these I could afford. They are all very expensive! I decided that for my infrequent use the "wrench with a 6 foot pipe” approach was best. I bought a 1 inch ratchet and 33 mm. deep socket. I bought both 8 inch and 17 inch long 1 inch drive extension on Ebay. I already had an over-center type ½ inch drive torque wrench which goes to 150 lb. ft. I made a bar which fits over the handle of the ratchet and has a ½ inch drive socket welded on the other end. When I put it all together I have the socket on an extension plugged
onto the ratchet. My adapter bar is fastened to the handle of the
ratchet, with the torque wrench plugged into the other end of the adapter
bar. The total assembly is 5 feet long (not quite the "6 foot pipe").
I made the dimensions so that 150 lb. ft on the torque wrench is 500 lb.
ft. at the lug nut, and 135 on the wrench is 450 at the lug nut.
I use a car stand to support the extension at the same height as the particular
lug nut I am loosening or tightening. It's probably about as much
work to adjust the stand to the proper height for each nut as it is to
loosen or tighten the nut. (Since this picture was taken, I have
gotten a stand that adjusts much more easily.)
It is a lot of work to remove a wheel, but this rig gives me the ability to do it. So far I have removed one pair of rear wheels and it all worked without a problem. I have also gone around and checked the lug nut torque on all the wheels. This setup looks ridiculous, but it works very well! I may get an adapter to allow me to use my 1/2 inch drive electric impact wrench. This would save a lot of effort once the lug nuts are broken loose, and would tighten them to the point that I only have to manually do the final torquing on reassembly. The total cost of the ratchet, extensions, and socket was less than
$100.
|
||||||||||
|
Dick Mason, Prescott, AZ 2/18/05
|