Replacing the Refrigerator with a Residential Unit
Description and Purpose
As with my two motorhomes before it, my Foretravel came equipped with an absorbtion type refrigerator which would run from either 120 volts AC or from Propane. My previous refrigerators were only 6 cu. ft. This one has an 8 cubic foot capacity. Also, as with one of my previous refrigerators, this one just failed!
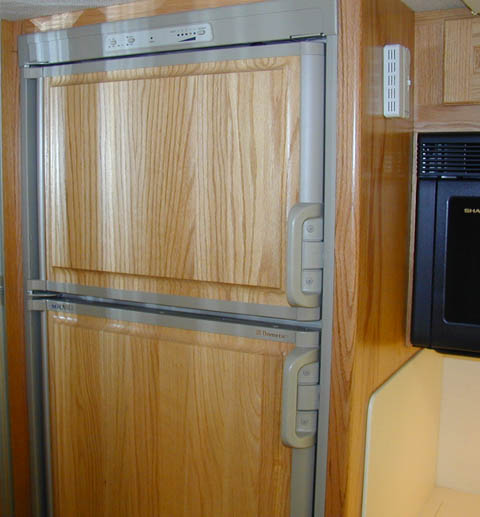
The stock refrigerator was very nice. Running from either AC or propane, it did its job well - until last week!
After running several tests which verified that the unit was indeed dead, I priced comparable new units both on-line and locally. The best price I found on-line was over $1300 plus tax delivered. The local price was over $2600 installed. That's over twice what I paid for my 25 cu. ft. stainless deluxe refrigerator I bought for my home several years ago! I did have the option of buying a rebuilt cooling unit for about $700, but the reported reliability of these is very poor.
For some time I have been following the trend of using residential refrigerators in RV's with some interest. These refrigerators obviously run only from 120 volts AC and have no provision to run from propane. They are much less expensive to buy, they are less expensive to run, they last longer, and they are safer. Even when boondocking, they are proving to be practical, especially with a decent battery capacity and solar power such as I have. Many new rigs are coming standard with these refrigerators installed.
I did research on the Internet and found many examples of rigs similar to mine that had been converted, with excellent descriptions and photos of the conversions. There were a couple of specific makes and models of refrigerators that were commonly used and I started researching them. I was unable to find either of these models to look at in our local stores, but I did find a couple other models that appeared to be good contenders. One was a beautiful Kenmore model that would fit, was large inside, and had a stainless steel finish. Unfortunately, upon a second visit to the store, I found that the door would not open within the width of the refrigerator, but would swing about 3 inches beyond the side when open. My unit is in a corner, and anything beyond about 1 inch past the side will impact a mirror on the connecting wall. Another unit used the side walls to dissipate the condenser heat, and required a 3 inch clearance on each side. A third unit had a customer review rating of 1.6 stars of 5 with many quality complaints.
The unit that appeared best qualified is sold only by Lowes and was listed as unavailable in any of the local stores. I called the 800 number they gave and talked to a very helpful lady. She looked it up and said that a shipment had just cleared customs and one could be in my store in about two weeks. I placed an order for a black Haier, 10.11 cu. ft. refrigerator. As I write this (3/16/15) I am waiting for delivery. They offer free delivery and will take my old unit at the same time. The cost for this unit is under $400.
Removal of old refrigerator.
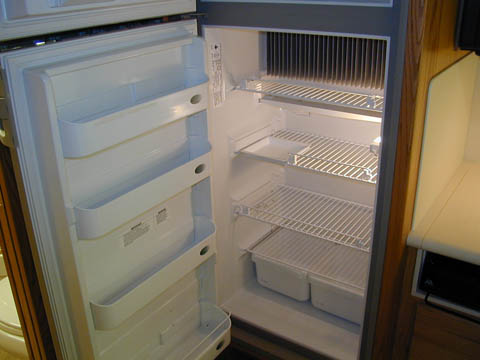
My first job was to remove the old, dead unit. I disconnected the electrical and propane connections, removed all the mounting screws and removed the unit. That was quite straight forward, except the weather strip they used around the front flange was very hard to break loose. Once I did, the unit just slid out the front onto the furniture dolly I had waiting.
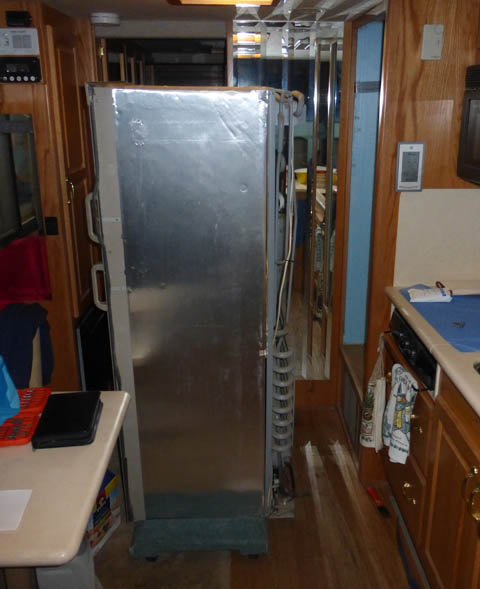
The refrigerator is out and sitting on my dolly.
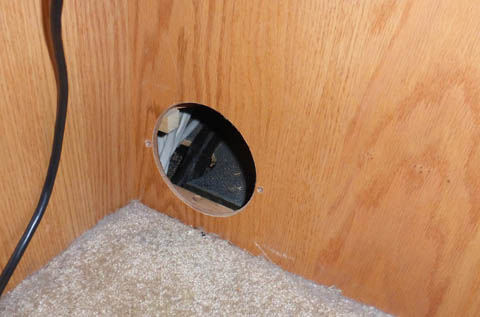
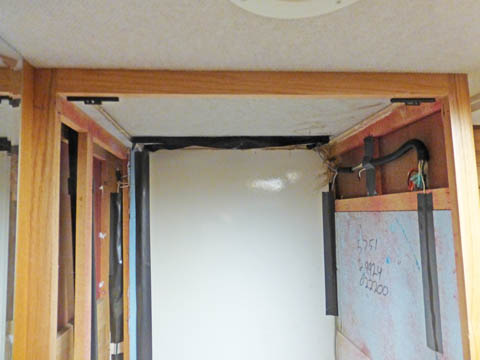
This is the cubicle where the refrigerator used to live. The open hole to the outside
is where the vent and access cover goes. It is off right now.
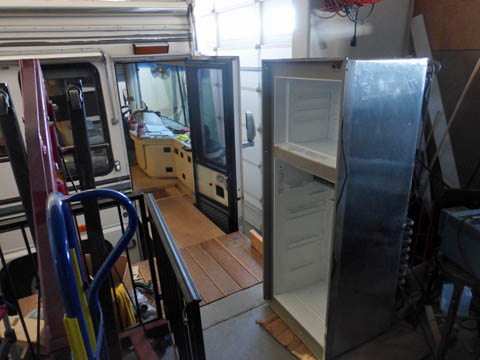
Actually getting the unit out of the
motorhome was quite a
chore. I removed the refrigerator doors and their hinges and any other parts I
could. This left me a unit just about 24 by 24 inches. I
did not have a 24 inch wide path to and through the motor home door, so I had to
make one. I first unbolted the passenger seat and moved it away
from the door. I then removed the side rails from the ramp and
unbolted the top bracket from the door so I could swing the door a
little past 90 degrees open. Now, as the height of refrigerator
is only 1 inch less than the door opening with the ramp in place, I
worked it off the dolly onto a piece of cardboard and
carefully slid it around in the front of the motorhome, through the
door, and across the ramp. It was very close, but it fit!
The ramp I built for handicap purposes has really proved useful
in other ways!
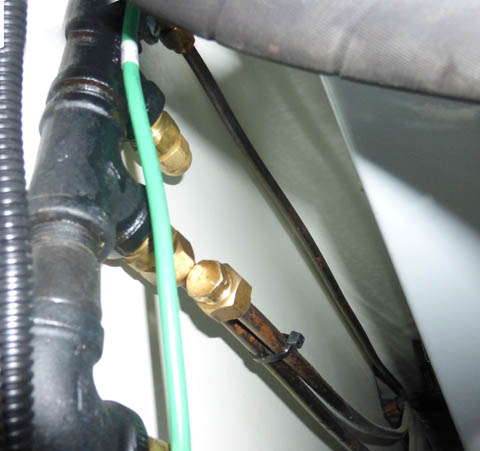
I have now successfully removed the old refrigerator from the motorhome. I disconnected the other end of the refrigerator propane line from the
manifold, plugged both ends of the line, capped the manifold port and leak tested the active propane connections. Now the propane system is secure
and the line will be kept clean just in case I ever decide to use it again.
Wiring
A number of posts on the Foretravel forum have stated that the company wired the electrical outlet behind the refrigerator so the top position was connected directly to the power and the bottom position was wired through the inverter. This way it was easy to connect it so it would run from battery power or not. I thought this was great and grabbed my electrical tester to verify that my rig had truly been wired that way. No joy! Both positions were hot with the motorhome plugged in, neither when running from inverter power. I need to rewire something so I can run from the inverter while on the road, or camped without power.
I looked at several possibilities of just moving the wire feeding the refrigerator to another breaker, but I always saw a problem with another device on the same line. After eliminating any easy solutions, I decided to run a new wire from the inverter breaker box to the refrigerator. There is room for 3 additional breakers in that box, so I can add one just for the refrigerator. Routing the wire cannot be that hard - can it? (Answer - YES!)
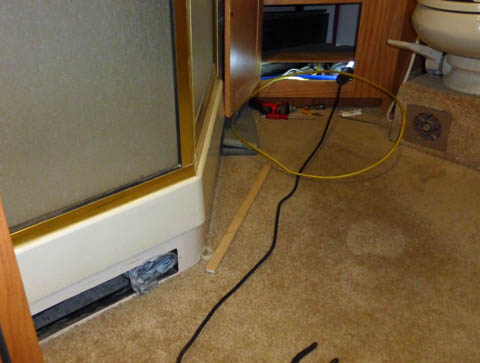
The breaker boxes are in the area at the foot of the bed and are easily accessible by lifting the foot of the bed. The bed is hinged and has gas springs to hold it up. Existing wiring heading forward goes into a large hole in the floor into a tunnel forward to under the shower, where it passes back up through another hole. It then runs under the shower into the bottom of the corner cabinet in the bath room, and then forward into the furnace compartment which is directly under the refrigerator. That is where I want to go! Other wires continue forward from there.
I spent what seemed like hours, but was really probably less than one hour, trying to fish a wire through the tunnel between the bed and the shower. Finally I made it and it was just a matter of pulling a little wire at a time then feeding it through the next obstacle until I had it the full distance.
A number of posts on the Foretravel forum have stated that the company wired the electrical outlet behind the refrigerator so the top position was connected directly to the power and the bottom position was wired through the inverter. This way it was easy to connect it so it would run from battery power or not. I thought this was great and grabbed my electrical tester to verify that my rig had truly been wired that way. No joy! Both positions were hot with the motorhome plugged in, neither when running from inverter power. I need to rewire something so I can run from the inverter while on the road, or camped without power.
I looked at several possibilities of just moving the wire feeding the refrigerator to another breaker, but I always saw a problem with another device on the same line. After eliminating any easy solutions, I decided to run a new wire from the inverter breaker box to the refrigerator. There is room for 3 additional breakers in that box, so I can add one just for the refrigerator. Routing the wire cannot be that hard - can it? (Answer - YES!)
The breaker boxes are in the area at the foot of the bed and are easily accessible by lifting the foot of the bed. The bed is hinged and has gas springs to hold it up. Existing wiring heading forward goes into a large hole in the floor into a tunnel forward to under the shower, where it passes back up through another hole. It then runs under the shower into the bottom of the corner cabinet in the bath room, and then forward into the furnace compartment which is directly under the refrigerator. That is where I want to go! Other wires continue forward from there.
I spent what seemed like hours, but was really probably less than one hour, trying to fish a wire through the tunnel between the bed and the shower. Finally I made it and it was just a matter of pulling a little wire at a time then feeding it through the next obstacle until I had it the full distance.
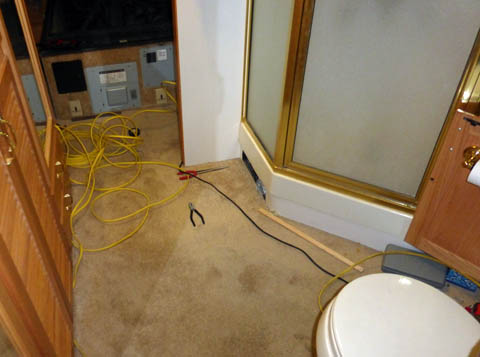
The area was a mess while I was trying to fish the wire. I fished one end of the coil of romex from
the bed, and the other from the furnace enclosure. After pulling enough wire into the
bathroom from the bed, I fished it to the furnace using the other end of the coil.
You can clearly see the circuit breaker boxes on the foot of the bed.
This is a view standing over the foot of the bed looking directly down. You can see
the hole where wires enter the tunnel to the bathroom, including the newly added yellow one.
This is the bedroom wall leading to the bathroom. I removed a furnace grill and pushed its duct
hose out of the way. Through it I can now see and reach the wires as they come back up from
the tunnel. Once I was successful getting the wire to here, I spent a long time pushing wire
in the bed opening and pulling it here, an inch at a time until I had enough to pull through
the shower vent opening, where I was able to pull much longer lengths at a time.
In the bathroom, the shower is built with an open area under the pan to run wires, ducts,
and plumbing. I was finally able to pull all the wire I needed through this vent, after removing
the grill, then I fished it through the back of the shower area into the corner cabinet under its floor,
and through to the furnace enclosure. The wire will now rest with a small coil at each end until
I receive the new refrigerator. I can then determine the best location for the outlet and complete the
connections.
This was as far as I dared go until
receiving my new refrigerator. There are just too many unknowns
to proceed until they are resolved. As we were about to head out
on an RV rally with our local rv club, I put everything I could back
together and prepared for travel. I blocked the two air vents to
the refrigerator compartment, as they now opened directly to the
interior of the motor home. We placed an ice chest where the
refrigerator was and headed to Tombstone, AZ for the rally. The
ice chest, although not that great, served us well. I added ice
every day from our ice maker and it all worked.
Refrigerator arrives
Upon arriving home from Tombstone on a Thursday afternoon, I found that Lowes truly had my unit and was scheduled to deliver it on Saturday.
The delivery men from Lowes carried the refrigerator right into the motor home and set it just a few feet from its destination. They probably would have put it right into the opening for it had I wanted them to. They also hauled off my old, dead refrigerator.
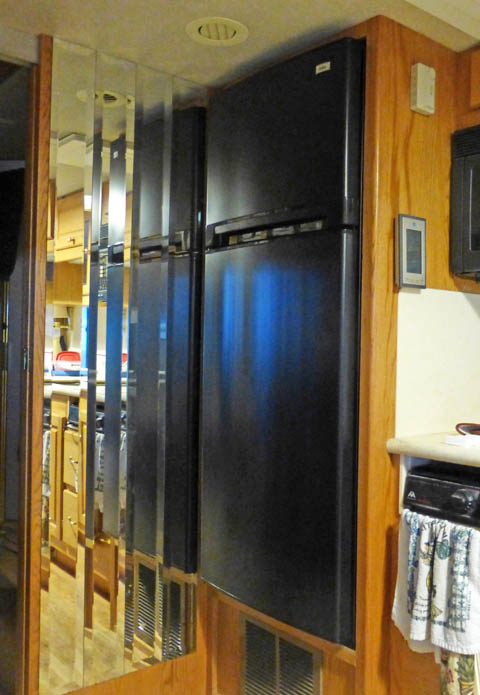
I removed the doors which needed to be reversed for a left hand hinge anyway, and test fitted the unit in the opening. It was almost eerie how well it fits! There is about 3/16 clearance on the sides and about 9/10's of an inch at the top. This is about the minimum I need to attach it at the top.
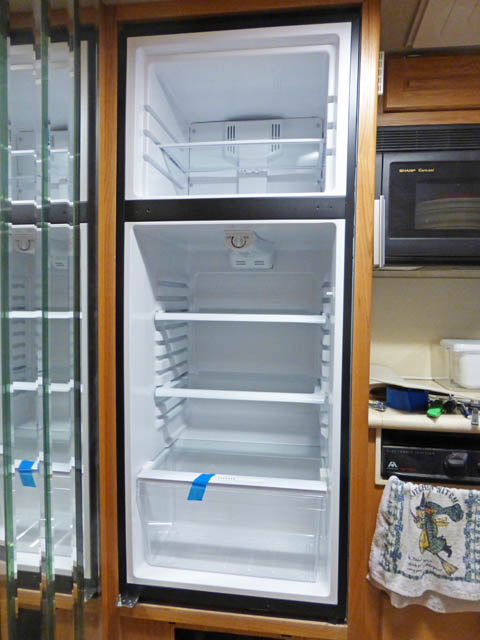
The new refrigerator fits the opening like a glove! Actually, I guess it fits like fingers
in a glove. And look at all the space it offers; at 10.11 cu. ft. it is more than 25%
larger than the previous unit in the same cabinet. Without the need for a bulky cooling
unit which ran the full height of the old refrigerator, the interior is much deeper.
Finishing Up (3/25/15)
OK, the main work is done. The refrigerator is in and working, but there are still several tasks needing to be completed.
1. Add the rear mounting bracket
2. Install and wire an outlet to the inverter using the previously run wire
3. Fabricate a closure board to totally block airflow through the bottom vent
4. Design and build a travel latch for the doors.
5. Fabricate a trim piece to close the top opening between the refrigerator and cabinet
For the rear bracket I decided that a single wide bracket screwed to the rear edge of the refrigerator frame and lag bolted down to the mounting shelf would be more than adequate. So I made and installed it.
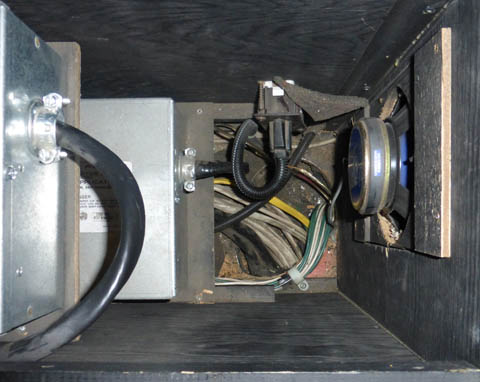
I installed the power outlet twice. The first time I used a fairly standard electrical box. At about 4 inches deep it hung well into the opening of the vent door and would cause major problems installing the vent blocking door, so I removed it and installed a very shallow box of about 1 1/2 inches deep. It was tight,, but it fit just fine. I then wired the other end of the new power wire to the inverter distribution box and the new breaker I bought for it. I now have inverter power to the refrigerator when the main power is disconnected.
In designing the vent closure door, I decided to mount it against the inside surface of the outer motorhome wall. This concept works well for the top and right sides, but plumbing and wiring on the left and the floor on the bottom don't leave enough of an edge to mount against. On these surfaces I mounted a 1/2 x 3/4 strip of wood to use as a mounting surface.

The rear mounting bracket is positioned in the center of the refrigerator.
The new outlet is in the upper right. It feeds from the main power lines unless there is no power there, in which
case it switches to the inverter. I left the original outlet in place, so I have a choice of direct feed or inverter feed.
I added a drain hose in case the defroster collection tray ever gets more than about 1/2 inch of water in it. I snipped
the drain hose off the previous refrigerator to use here.
The white strip along the bottom edge gives a mounting surface for the vent blocking door. There is a similar
strip on the left side of the opening.
The door to block the vent was a little more difficult than I anticipated. I started with a piece of 1/4 inch plywood (OK, I can never find the old standard thicknesses of plywood. Somewhere along the line 1/4 inch became 17/64 and all the other sizes changed by about 1/64 or 1/32. It's very annoying!). Anyway, I cut it to overlap the top and right sides of the opening about 1/2 inch and added a handle to it so I could maneuver it into place. I have to slide it up between the wall and the refrigerator on end, then when I get it high enough I have enough room to rotate it to the correct orientation, then I slide it down into position. There are several empty bosses with holes in the vent cover frame. I used 4 of these to screw the door into position. After getting it all fitted and then painting it, I added a block of Styrofoam to the back side for insulation, and a strip of weatherstripping around the front edge to assure a good seal. After trimming a small area of the foam to clear the power cord plug, it all fit!

The vent door is finally finished. I have 3/8 by 3/16 weatherstripping around the
front edge and a block of 1 1/2 in Styrofoam on the rear.
And here it is installed. The jury is still out on the weatherstripping. As I was sliding
the door down into position, the left edge foam dragged and rolled off the door and into
a small coil for a couple inches. It is very fragile, and I don't know what will happen
the first time I remove this door. It actually looks like it would seal fairly well without
anything added.
The original vent door mounts over this door just fine and looks totally normal.
Refrigerator arrives
Upon arriving home from Tombstone on a Thursday afternoon, I found that Lowes truly had my unit and was scheduled to deliver it on Saturday.
The delivery men from Lowes carried the refrigerator right into the motor home and set it just a few feet from its destination. They probably would have put it right into the opening for it had I wanted them to. They also hauled off my old, dead refrigerator.
I removed the doors which needed to be reversed for a left hand hinge anyway, and test fitted the unit in the opening. It was almost eerie how well it fits! There is about 3/16 clearance on the sides and about 9/10's of an inch at the top. This is about the minimum I need to attach it at the top.
The new refrigerator fits the opening like a glove! Actually, I guess it fits like fingers
in a glove. And look at all the space it offers; at 10.11 cu. ft. it is more than 25%
larger than the previous unit in the same cabinet. Without the need for a bulky cooling
unit which ran the full height of the old refrigerator, the interior is much deeper.
After my test fitting, I removed it from the enclosure and spent some time deciding just how to
mount it. I figured I need to secure it at the bottom and the top in the front, and at the bottom in the rear.
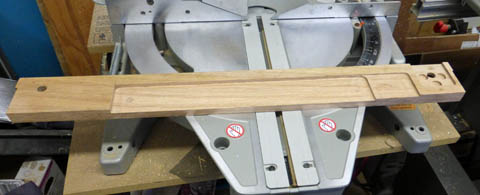
My solution for the front bottom, was to bolt an oak board to the bottom, using the leveling foot threads to attach it. I can then use lag bolts up through the mounting shelf into this board to secure it.
For the top front mounts I decided to fabricate brackets that bolt to the pre-threaded mounting holes for the door hinge. These holes are on both top corners to allow the hinge to be mounted on either side. These brackets will bolt to a pair of brackets I will mount to the top of the enclosure.
The rear bottom can be attached in any of several ways. The simplest would be to drill down through the bottom frame and bolt directly into the mounting shelf, however I think I will screw an angle bracket to the rear of the frame and screw that down to the floor.
I spent quite a bit of time on my CAD system to accurately define just what I need and then fabricated the pieces to those drawings.
The bottom mount took a bit of trial fitting. It bolts to the bottom of the refrigerator
through the two holes at the ends into the threads for the leveling feet. The bolt
heads are counterbored into the bottom. The cutouts at the right end fit snugly
around the hinge plate and its mounting bolts. The large cutouts in the center
are to clear the bulging insulation foam on the bottom.
I painted the front edge of this board satin black so to the eye it would "disappear"
into the bottom of the black refrigerator.
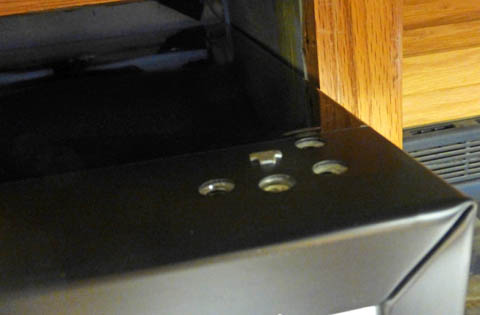
These holes appear on each front corner of the unit and are for mounting the door hinge.
Only the outer 3 are threaded holes.

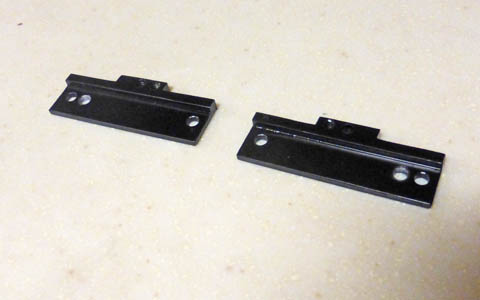
These are the top support brackets. The left one is not as tall, as it mounts on top of the hinge, using the same bolts.
The small threaded hole in each bracket is to mount a trim piece to fill the gap between the unit and the cabinet,
and hide these brackets.
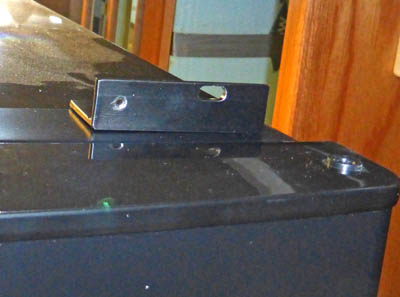
On the left are the brackets I made to mount to the cabinet. The brackets on the refrigerator bolt into these. The
right shows them mounted.
There were conflicting specs on the clearance needed around the refrigerator. The installation drawing
states a minimum cabinet width of 24 1/4 inch. This allows about 3/8 inch clearance on each side.
Another spec. states a side clearance of 1 inch is needed. Since I have already decided to make the
compartment indoor space by sealing the vents, I removed the foam insulation on each side providing
over an inch on the right and several inches on the left.
It is up and running! Within about 45 minutes, the freezer was below 0 and the
refrigerator was below 40. I actually set the control somewhat warmer to raise
these temperatures slightly.
My solution for the front bottom, was to bolt an oak board to the bottom, using the leveling foot threads to attach it. I can then use lag bolts up through the mounting shelf into this board to secure it.
For the top front mounts I decided to fabricate brackets that bolt to the pre-threaded mounting holes for the door hinge. These holes are on both top corners to allow the hinge to be mounted on either side. These brackets will bolt to a pair of brackets I will mount to the top of the enclosure.
The rear bottom can be attached in any of several ways. The simplest would be to drill down through the bottom frame and bolt directly into the mounting shelf, however I think I will screw an angle bracket to the rear of the frame and screw that down to the floor.
I spent quite a bit of time on my CAD system to accurately define just what I need and then fabricated the pieces to those drawings.
The bottom mount took a bit of trial fitting. It bolts to the bottom of the refrigerator
through the two holes at the ends into the threads for the leveling feet. The bolt
heads are counterbored into the bottom. The cutouts at the right end fit snugly
around the hinge plate and its mounting bolts. The large cutouts in the center
are to clear the bulging insulation foam on the bottom.
I painted the front edge of this board satin black so to the eye it would "disappear"
into the bottom of the black refrigerator.
These holes appear on each front corner of the unit and are for mounting the door hinge.
Only the outer 3 are threaded holes.
These are the top support brackets. The left one is not as tall, as it mounts on top of the hinge, using the same bolts.
The small threaded hole in each bracket is to mount a trim piece to fill the gap between the unit and the cabinet,
and hide these brackets.
On the left are the brackets I made to mount to the cabinet. The brackets on the refrigerator bolt into these. The
right shows them mounted.
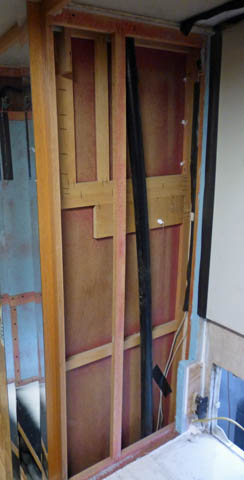
Originally
the refrigerator enclosure was "outdoor space". It was vented to
the outside both at the top, through the vent on the roof, and through
the bottom of the back side through a plastic vent cover which also
provided access to the active parts of the absorption refrigerator.
The walls of the cubicle were insulated with foam blocks, and the
front flanges of the refrigerator were sealed against the cabinet front.
I have decided to change this space to "indoor space". To do this I need to seal and insulate both vents. While the compartment was empty, I closed off the roof vent by laying sheet plastic over the opening and pressing thick foam blocks into the opening. The plastic formed a good seal and the foam formed both the insulation and the holding force to retain the plastic. It is not beautiful, but it is secure and functional, and cannot be seen unless the refrigerator is removed.
I have decided to change this space to "indoor space". To do this I need to seal and insulate both vents. While the compartment was empty, I closed off the roof vent by laying sheet plastic over the opening and pressing thick foam blocks into the opening. The plastic formed a good seal and the foam formed both the insulation and the holding force to retain the plastic. It is not beautiful, but it is secure and functional, and cannot be seen unless the refrigerator is removed.
There were conflicting specs on the clearance needed around the refrigerator. The installation drawing
states a minimum cabinet width of 24 1/4 inch. This allows about 3/8 inch clearance on each side.
Another spec. states a side clearance of 1 inch is needed. Since I have already decided to make the
compartment indoor space by sealing the vents, I removed the foam insulation on each side providing
over an inch on the right and several inches on the left.
It is up and running! Within about 45 minutes, the freezer was below 0 and the
refrigerator was below 40. I actually set the control somewhat warmer to raise
these temperatures slightly.
Finishing Up (3/25/15)
OK, the main work is done. The refrigerator is in and working, but there are still several tasks needing to be completed.
1. Add the rear mounting bracket
2. Install and wire an outlet to the inverter using the previously run wire
3. Fabricate a closure board to totally block airflow through the bottom vent
4. Design and build a travel latch for the doors.
5. Fabricate a trim piece to close the top opening between the refrigerator and cabinet
For the rear bracket I decided that a single wide bracket screwed to the rear edge of the refrigerator frame and lag bolted down to the mounting shelf would be more than adequate. So I made and installed it.
I installed the power outlet twice. The first time I used a fairly standard electrical box. At about 4 inches deep it hung well into the opening of the vent door and would cause major problems installing the vent blocking door, so I removed it and installed a very shallow box of about 1 1/2 inches deep. It was tight,, but it fit just fine. I then wired the other end of the new power wire to the inverter distribution box and the new breaker I bought for it. I now have inverter power to the refrigerator when the main power is disconnected.
In designing the vent closure door, I decided to mount it against the inside surface of the outer motorhome wall. This concept works well for the top and right sides, but plumbing and wiring on the left and the floor on the bottom don't leave enough of an edge to mount against. On these surfaces I mounted a 1/2 x 3/4 strip of wood to use as a mounting surface.
The rear mounting bracket is positioned in the center of the refrigerator.
The new outlet is in the upper right. It feeds from the main power lines unless there is no power there, in which
case it switches to the inverter. I left the original outlet in place, so I have a choice of direct feed or inverter feed.
I added a drain hose in case the defroster collection tray ever gets more than about 1/2 inch of water in it. I snipped
the drain hose off the previous refrigerator to use here.
The white strip along the bottom edge gives a mounting surface for the vent blocking door. There is a similar
strip on the left side of the opening.
The door to block the vent was a little more difficult than I anticipated. I started with a piece of 1/4 inch plywood (OK, I can never find the old standard thicknesses of plywood. Somewhere along the line 1/4 inch became 17/64 and all the other sizes changed by about 1/64 or 1/32. It's very annoying!). Anyway, I cut it to overlap the top and right sides of the opening about 1/2 inch and added a handle to it so I could maneuver it into place. I have to slide it up between the wall and the refrigerator on end, then when I get it high enough I have enough room to rotate it to the correct orientation, then I slide it down into position. There are several empty bosses with holes in the vent cover frame. I used 4 of these to screw the door into position. After getting it all fitted and then painting it, I added a block of Styrofoam to the back side for insulation, and a strip of weatherstripping around the front edge to assure a good seal. After trimming a small area of the foam to clear the power cord plug, it all fit!
The vent door is finally finished. I have 3/8 by 3/16 weatherstripping around the
front edge and a block of 1 1/2 in Styrofoam on the rear.
And here it is installed. The jury is still out on the weatherstripping. As I was sliding
the door down into position, the left edge foam dragged and rolled off the door and into
a small coil for a couple inches. It is very fragile, and I don't know what will happen
the first time I remove this door. It actually looks like it would seal fairly well without
anything added.
The original vent door mounts over this door just fine and looks totally normal.
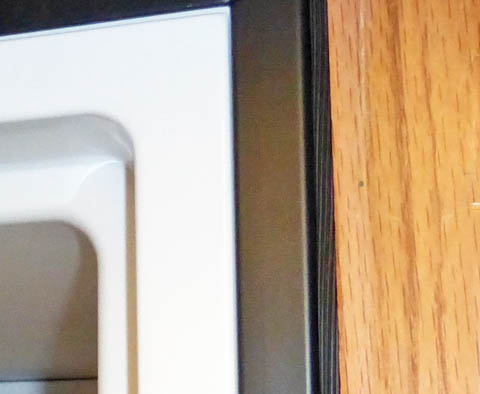
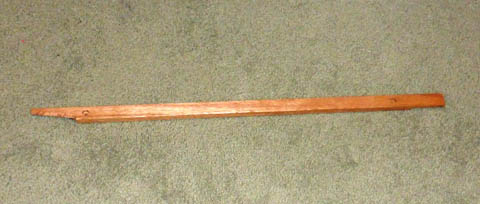
A length of screen door spline pressed into the gap alongside the
refrigerator improves the looks.
I cut a 0.5 by 0.85 piece of oak to fill in the top gap in the cabinet. The wierd
shape at the left was needed to clear the door hinge. I decided to leave this
strip natural oak to match the cabinetry. It probably didn't matter whether I
made it natural or black as you can only see it with the freezer door open.
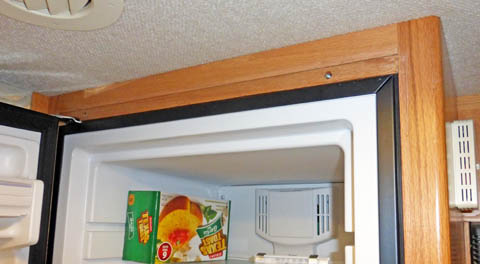
And here the filler strip is installed.
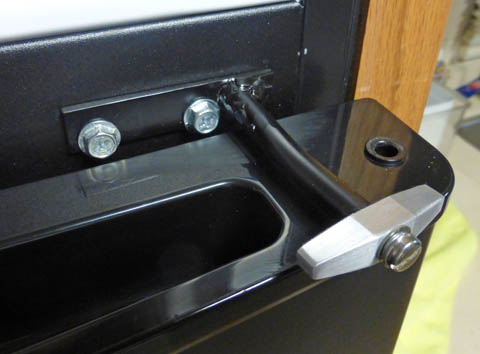
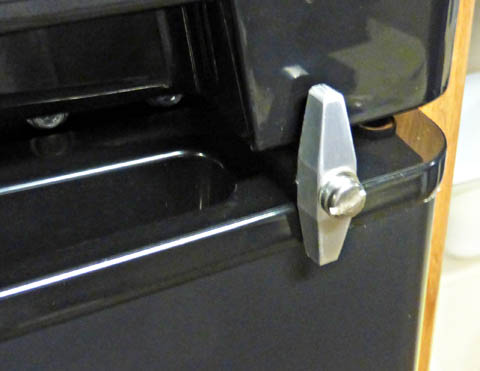
I made several designs for a travel latch for the doors. They all mount using the two threaded holes made for the reversible door hinge.
This simple one uses a piece of drill rod welded to a base plate. A twistable aluminum bar serves as the lock. When turned horizontal
it easily clears both doors. The bend in the drill rod is to align the block with the angled door front. I covered the back of the latch
with vinyl tape to avoid scratches. The turning friction is supplied by a lock washer between 2 washers on the front, not tightened
all the way, just enough for the needed spring load. Loctite secures the screw.
This latch should work just fine, but is totally manual. If I forget to set it prior to travel I could be in big trouble. What I really
want and will try to make is a latch which requires you to press something to open the door, but which always leaves the door latched.
That
is the final task I had defined. This job is done. I will
be trying it out on a local rally in about two weeks. I have
high hopes.
Addendum of 1/28/2020: The refrigerator has been working very well for almost 5 years now with one exception. About 5 months ago I went to the motor home to place something in the freezer, and everything was at room temperature. Fortunately I only had a couple items in the freezer and not much in the refrigerator. I did some probing and reading and decided it was the start relay. About $50 and a few days later the new one arrived and in less than an hour I had it installed, tested, and all put back together. It has been running great since then. I am disappointed that there was a failure, but if that is the only problem I have, then I will be totally happy with this unit.
Second addendum several months later: Around mid-year I received a recall notice on this refrigerator for a problem with the compressor control of this refrigerator. It turns out to be the exact parts I just replaced. I tried to explain that I had already replaced the recalled parts, but they insisted that I need the "official" repair parts. The result is that I have a complete set of spare parts should I ever experience another compressor control failure.
R. S. Mason 3/15/2015