Replacing the House Batteries
The
house batteries that came with my Foretravel U270 were 2 huge size 8D gel cell
batteries with a capacity of 225 amp hours each at 12 volts. My
batteries are now more than 13 years old and are showing signs of decreasing
capacity, as you might expect with batteries this old. My
estimate is that they are down to about half the original capacity.
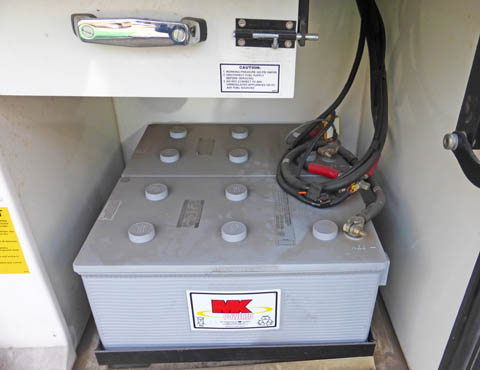
These are my original gel cell batteries. They weigh over 160 pounds each!
These are my original gel cell batteries. They weigh over 160 pounds each!
In
looking for options, I first researched sources for an exact
replacement of my current batteries. They are readily available
for about $600 to $800 EACH plus freight for 2 units weighing about 160
pounds each. I also looked into size 8D AGM (absorbed glass mat)
batteries which like the gel cells, are maintenance free, leak proof
batteries with excellent performance characteristics. I found the
prices to be about the same. About $1400 (batteries plus freight)
is just too much for me to spend right now, so I either have to
postpone replacement or find an alternative.
Lucky Break!
A good friend of mine showed me the new house batteries he just installed in his rig. They consisted of two 6 volt AGM batteries that a local battery distributer had recycled. Upon investigating and tracking down the source, I found that the local Interstate battery distributer had just replaced the batteries from two brand new luxury houseboats on Lake Powell because the new owners went to use the boats and found the batteries discharged. They insisted on a set of new batteries (12 batteries per houseboat). Interstate took the old batteries which were manufactured in 2014 and ran them through a standardized testing and cycling routine to verify their quality. They then sold the batteries as recycled for $61 each. I first bought 4, then after verifying the dimensions and performance specs, I bought 2 more. I discovered that these batteries were originally US Battery AGM2000 batteries. During the recycling processes, all the original lables were removed and a small "Econo Power" label added. The AGM2000 batteries originally sold for about $280 to $300 each.

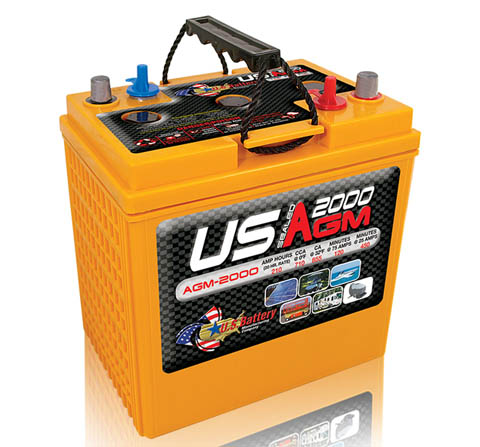
My new batteries don't look nearly as fancy as they once did with the colorful lables, but inside it is the same battery!
The six new batteries will not quite fit into the existing battery box, but by adding only 1 1/2 inch to one end, they will fit perfectly. And I thought my battery box making days were over when I finished my electric truck!
The old batteries gave me a specified capacity of 450 amp hours when new. These batteries are rated to give me 639 amp hours. Allowing for the recycling I am assuming about 600.
Making it Happen
The first step in this conversion was to remove the old batteries. At about 160 pounds each, I had a problem. I cannot lift that much at arms length (or at any length).
I thought of using my engine hoist, but the angle would have been dificult as well as requiring me to move the motorhome to where I had room for the hoist. I would have had to make some sort of special fixture to be able to reach into the battery and then lower it to the floor.
I thought of using a 2x4 as a lever and lifting and swinging the batteries out onto something, but decided that was too complicated and would not have enough range to lower the batteries all the way to the floor.
I thought of hiring 2 strong guys to lift them out, but that was too inconvienient and expensive. And where would I get the guys?
I finally decided that simple was best. I found a 2x4 that would just fit in the battery tray. I tilted the front battery until I could put the board under it (I was able to tilt it as far as I wanted, as the batteries will not leak at any angle). Tilting it straight again, the battery was now sitting upright on the board, above the edges of the tray. I then placed another board on the edge of the compartment leading to the ground. I slid the battery over the edge of the tray, rotated it and slid it down the 2nd board to the ground. It took less than a minute and I was easily able to control it and slide it to where I wanted it. I repeated the process for the 2nd battery and in a matter of a couple of minutes it was done. Problem solved!
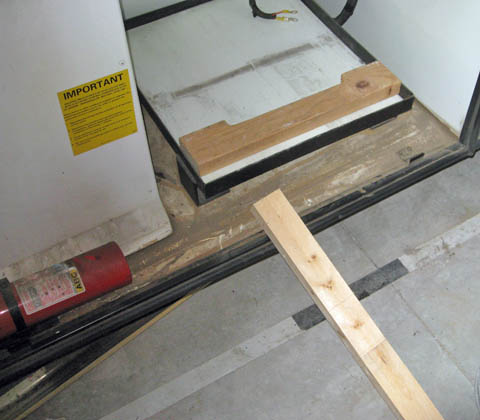
These two boards made removing the old batteries easy.
As I'm sure you noticed, this compartment gets very dirty due to a couple of vents in
the floor allowing road dirt to directly enter the compartment. I'm afraid this will be
a continuing problem.
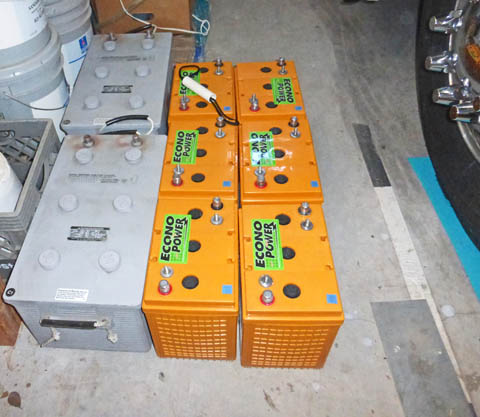
Here are the two old batteries and the six new ones that will replace them.
It looks like the new batteries are somewhat smaller than the old ones, but they
are acutally slightly larger.
Modifying the Battery Rack
To allow the new batteries to fit in the rack, I needed to add 1 1/2 inches to one side of the rack. This was a convenient amount, as the rack was made of 1 1/2 angle. By cutting the vertical leg off the right side angle and welding an additional 1 1/2 angle to that, I was able to complete the modification. I also had to add 2 small squares of steel to complete the front and back rails where the angle was added. I then added a couple of angles across the rack to provide support for each battery. I painted it and cut a new fiberglass insert to line the slightly larger tray. This completed the modifications, and the tray was returned to the motor home.
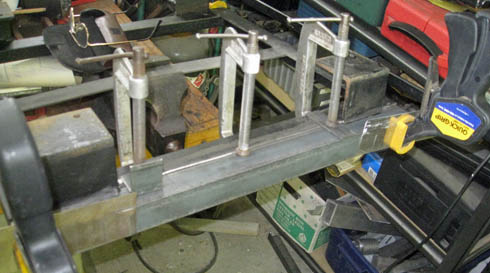
After removing the vertical leg of the right side angle, I securely clamped an additional
length of angle to the cut edge. The clamps assure the new piece is exactly aligned with
the old one and is pressed tightly to it. I then tack welded in several places, removed
the clamps, and finished welding it. The rack is upside down here.
The result is a battery tray that is just 1 1/2 inches wider than it was.
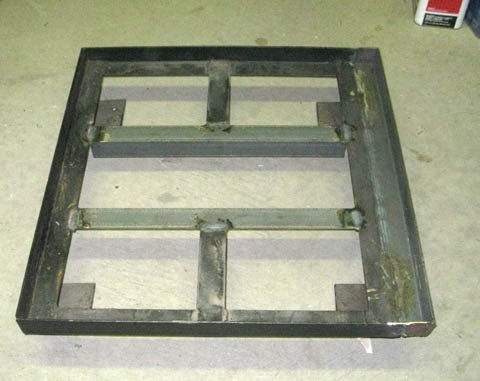
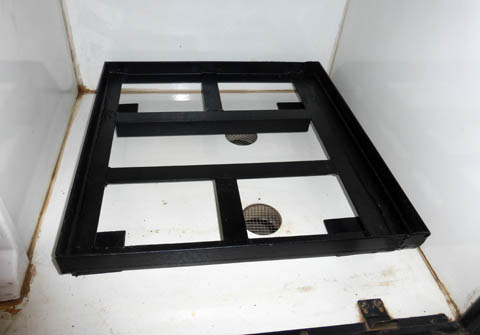
The left picture shows the rack after the completed modifications, before the welds were ground flat. The right one shows
the painted and installed rack. You can see that the right side has been enlarged by 1 1/2 inches.
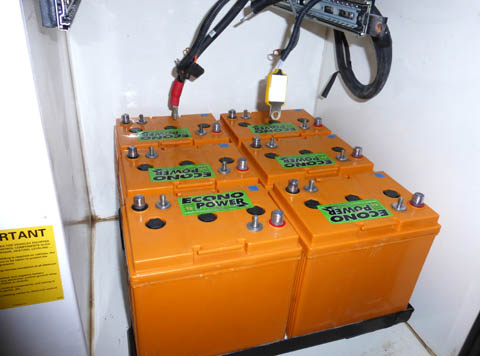
And here are the six new batteries in place in the rack. I added wooden strips
between the bottom edges of the batteries to maintain the proper spacing.
Each pair of batteries will be connected in series, yielding three 12 volt batteries.
These 12 volt battery pairs will then be conneced in parallel.
Lucky Break!
A good friend of mine showed me the new house batteries he just installed in his rig. They consisted of two 6 volt AGM batteries that a local battery distributer had recycled. Upon investigating and tracking down the source, I found that the local Interstate battery distributer had just replaced the batteries from two brand new luxury houseboats on Lake Powell because the new owners went to use the boats and found the batteries discharged. They insisted on a set of new batteries (12 batteries per houseboat). Interstate took the old batteries which were manufactured in 2014 and ran them through a standardized testing and cycling routine to verify their quality. They then sold the batteries as recycled for $61 each. I first bought 4, then after verifying the dimensions and performance specs, I bought 2 more. I discovered that these batteries were originally US Battery AGM2000 batteries. During the recycling processes, all the original lables were removed and a small "Econo Power" label added. The AGM2000 batteries originally sold for about $280 to $300 each.
My new batteries don't look nearly as fancy as they once did with the colorful lables, but inside it is the same battery!
The six new batteries will not quite fit into the existing battery box, but by adding only 1 1/2 inch to one end, they will fit perfectly. And I thought my battery box making days were over when I finished my electric truck!
The old batteries gave me a specified capacity of 450 amp hours when new. These batteries are rated to give me 639 amp hours. Allowing for the recycling I am assuming about 600.
Making it Happen
The first step in this conversion was to remove the old batteries. At about 160 pounds each, I had a problem. I cannot lift that much at arms length (or at any length).
I thought of using my engine hoist, but the angle would have been dificult as well as requiring me to move the motorhome to where I had room for the hoist. I would have had to make some sort of special fixture to be able to reach into the battery and then lower it to the floor.
I thought of using a 2x4 as a lever and lifting and swinging the batteries out onto something, but decided that was too complicated and would not have enough range to lower the batteries all the way to the floor.
I thought of hiring 2 strong guys to lift them out, but that was too inconvienient and expensive. And where would I get the guys?
I finally decided that simple was best. I found a 2x4 that would just fit in the battery tray. I tilted the front battery until I could put the board under it (I was able to tilt it as far as I wanted, as the batteries will not leak at any angle). Tilting it straight again, the battery was now sitting upright on the board, above the edges of the tray. I then placed another board on the edge of the compartment leading to the ground. I slid the battery over the edge of the tray, rotated it and slid it down the 2nd board to the ground. It took less than a minute and I was easily able to control it and slide it to where I wanted it. I repeated the process for the 2nd battery and in a matter of a couple of minutes it was done. Problem solved!
These two boards made removing the old batteries easy.
As I'm sure you noticed, this compartment gets very dirty due to a couple of vents in
the floor allowing road dirt to directly enter the compartment. I'm afraid this will be
a continuing problem.
Here are the two old batteries and the six new ones that will replace them.
It looks like the new batteries are somewhat smaller than the old ones, but they
are acutally slightly larger.
Modifying the Battery Rack
To allow the new batteries to fit in the rack, I needed to add 1 1/2 inches to one side of the rack. This was a convenient amount, as the rack was made of 1 1/2 angle. By cutting the vertical leg off the right side angle and welding an additional 1 1/2 angle to that, I was able to complete the modification. I also had to add 2 small squares of steel to complete the front and back rails where the angle was added. I then added a couple of angles across the rack to provide support for each battery. I painted it and cut a new fiberglass insert to line the slightly larger tray. This completed the modifications, and the tray was returned to the motor home.
After removing the vertical leg of the right side angle, I securely clamped an additional
length of angle to the cut edge. The clamps assure the new piece is exactly aligned with
the old one and is pressed tightly to it. I then tack welded in several places, removed
the clamps, and finished welding it. The rack is upside down here.
The result is a battery tray that is just 1 1/2 inches wider than it was.
The left picture shows the rack after the completed modifications, before the welds were ground flat. The right one shows
the painted and installed rack. You can see that the right side has been enlarged by 1 1/2 inches.
And here are the six new batteries in place in the rack. I added wooden strips
between the bottom edges of the batteries to maintain the proper spacing.
Each pair of batteries will be connected in series, yielding three 12 volt batteries.
These 12 volt battery pairs will then be conneced in parallel.
A Balancing Act
Now that the batteries are in place, I need to make a lot of connections! As I am now using 6 volt batteries I need to connect pairs of batteries in series to give me three 12 volt batteries. Then, of course the 3 need to be connected in parallel to yield one battery pack.
Here is where far too many people fail. For the best performance and longest life the wiring between parallel batteies must be balanced. By that, I mean that the length of wire between the coach and each battery should be the same. It is too easy to just connect to both poles of a single battery and figure that it is fine. The following pictures illustrate this.
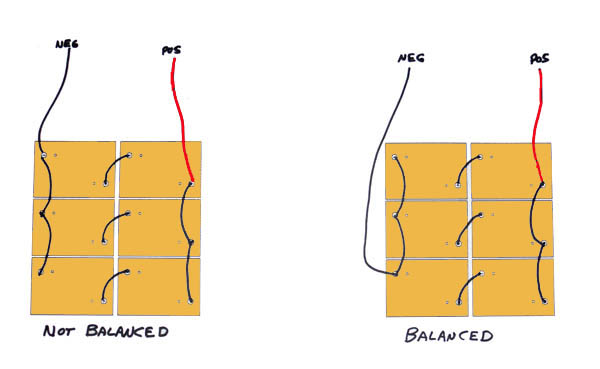
On the left you can see a battery pack like mine. The three 12 volt batteries that result by series connecting
each pair are then connected in parallel. By connecting the coach cables to the top battery, the top battery
is connected directly, the 2nd battery is connected through 2 lengths of added cable, and the third battery
through 4 added lengths of cable
Each cable has some resistance, so during discharge, the top battery is suupplying the most current, the 2nd
somewhat less, and the bottom battery even less. The same is true during charging, escept the top battery is
receiving the most charge, etc. The higher the current flow, the greater the imbalance.
On the right, by connecting one coach cable to the top battery and the other to the bottom, every battery is connected
through 2 additional cables. All three batteries theoretically receive exactly the same level of discharge and charge.
They are balanced! Yes it really matters!
Making the Bus Bars
Now that I have figured out what needs to be connected to what, I have to actually do it. I looked at using flexible cables to make the 7 links between batteries, but decided that it is just too complex. Instead I decided to use copper bus bars.
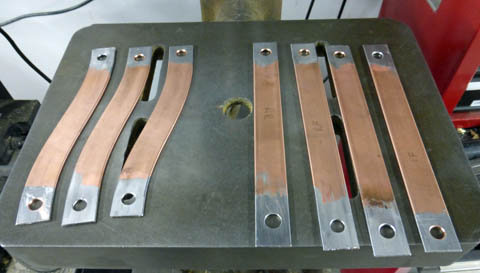
Since it is hard to find proper sized copper around here, I used a trick I developed while converting my electric truck. I started with a length of 1/2 inch type L (thicker wall) copper pipe from Home Depot. I then cut and heated each length to a dull cherry red and cooled it to anneal it making it very soft. I then used my shop press and some plates to flatten each length. The result was a flat bar just under an inch wide and almost 3/32 thick. This gives a cross section that is very adequate for the current and allowable voltage drop.
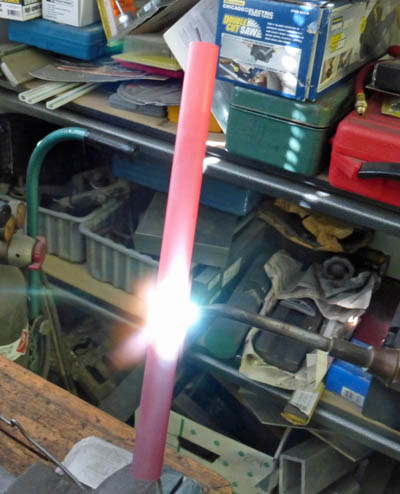
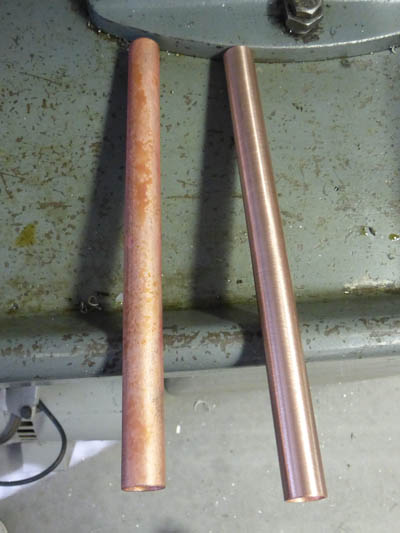
I started making the bus bars by heating a length of copper pipe to a cherry red, then quenching it in
water. I found that by using a reducing (low on oxygen) flame and quenching it, the black oxidation that
I had on early trials flaked off into the water, leaving a fairly nice finish. The right picture shows
this finish and the finish after a light polishing with a Schotchbrite pad.
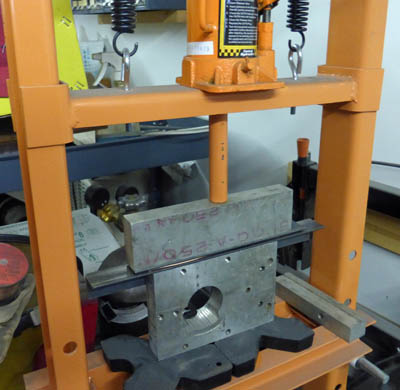
Now that the copper is dead soft, I can flatten it. I ended up using my shop press
for this. I smoothed one face of a couple lengths of angle iron and used these
to give a nice finish on the flattened copper.
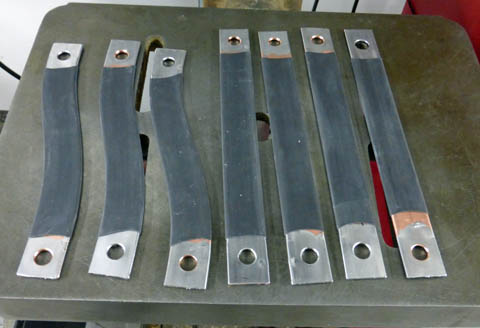
For the series connection links, I curved the soft tubing before flattening it to provide a little clearance
around the battery posts. Each battery terminal has both a threaded stud and an automotive type post. I solder
coated all the ends to minimize oxidation of the copper at the terminal areas. I then put on a piece of shrink
sleeving over each one to reduce the potential for shorts.
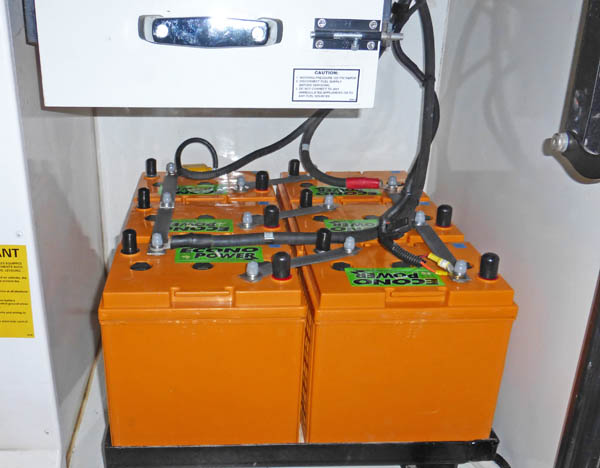
This is what I ended up with. All six batteries are installed and connected. I managed to find some small vinyl
caps that fit the studs and nuts, and some plastic chair tips that fit the automotive terminals. This should pretty well
protect against shorts from accidentally dropped wrenches, etc. The connections to the coach are at the upper right
and the lower left. The items on the upper left and lower right are the temperature sensors for the inverter/charger,
the solar controller, and the 12 volt monitoring system.
My final task of this project was to set all the correct parameters in my inverter/charger and in my 12 volt monitoring
system to correspond with my new battery type and capacity.
Now that the batteries are in place, I need to make a lot of connections! As I am now using 6 volt batteries I need to connect pairs of batteries in series to give me three 12 volt batteries. Then, of course the 3 need to be connected in parallel to yield one battery pack.
Here is where far too many people fail. For the best performance and longest life the wiring between parallel batteies must be balanced. By that, I mean that the length of wire between the coach and each battery should be the same. It is too easy to just connect to both poles of a single battery and figure that it is fine. The following pictures illustrate this.
On the left you can see a battery pack like mine. The three 12 volt batteries that result by series connecting
each pair are then connected in parallel. By connecting the coach cables to the top battery, the top battery
is connected directly, the 2nd battery is connected through 2 lengths of added cable, and the third battery
through 4 added lengths of cable
Each cable has some resistance, so during discharge, the top battery is suupplying the most current, the 2nd
somewhat less, and the bottom battery even less. The same is true during charging, escept the top battery is
receiving the most charge, etc. The higher the current flow, the greater the imbalance.
On the right, by connecting one coach cable to the top battery and the other to the bottom, every battery is connected
through 2 additional cables. All three batteries theoretically receive exactly the same level of discharge and charge.
They are balanced! Yes it really matters!
Making the Bus Bars
Now that I have figured out what needs to be connected to what, I have to actually do it. I looked at using flexible cables to make the 7 links between batteries, but decided that it is just too complex. Instead I decided to use copper bus bars.
Since it is hard to find proper sized copper around here, I used a trick I developed while converting my electric truck. I started with a length of 1/2 inch type L (thicker wall) copper pipe from Home Depot. I then cut and heated each length to a dull cherry red and cooled it to anneal it making it very soft. I then used my shop press and some plates to flatten each length. The result was a flat bar just under an inch wide and almost 3/32 thick. This gives a cross section that is very adequate for the current and allowable voltage drop.
I started making the bus bars by heating a length of copper pipe to a cherry red, then quenching it in
water. I found that by using a reducing (low on oxygen) flame and quenching it, the black oxidation that
I had on early trials flaked off into the water, leaving a fairly nice finish. The right picture shows
this finish and the finish after a light polishing with a Schotchbrite pad.
Now that the copper is dead soft, I can flatten it. I ended up using my shop press
for this. I smoothed one face of a couple lengths of angle iron and used these
to give a nice finish on the flattened copper.
For the series connection links, I curved the soft tubing before flattening it to provide a little clearance
around the battery posts. Each battery terminal has both a threaded stud and an automotive type post. I solder
coated all the ends to minimize oxidation of the copper at the terminal areas. I then put on a piece of shrink
sleeving over each one to reduce the potential for shorts.
Finished Job
This is what I ended up with. All six batteries are installed and connected. I managed to find some small vinyl
caps that fit the studs and nuts, and some plastic chair tips that fit the automotive terminals. This should pretty well
protect against shorts from accidentally dropped wrenches, etc. The connections to the coach are at the upper right
and the lower left. The items on the upper left and lower right are the temperature sensors for the inverter/charger,
the solar controller, and the 12 volt monitoring system.
My final task of this project was to set all the correct parameters in my inverter/charger and in my 12 volt monitoring
system to correspond with my new battery type and capacity.
Conclusions
I am very pleased how this project came out. The $400 it cost me was about $1000 less than I would have had to spend to replace my original batteries, and I now have about a 33% higher battery capacity. If at any time in the future I desire to go back to the original type batteries, all I have to do is place a 1 1/2 inch wide spacer like a 2 x 2 in one end of the battery rack and the batteries will fit perfectly again.
I am very pleased how this project came out. The $400 it cost me was about $1000 less than I would have had to spend to replace my original batteries, and I now have about a 33% higher battery capacity. If at any time in the future I desire to go back to the original type batteries, all I have to do is place a 1 1/2 inch wide spacer like a 2 x 2 in one end of the battery rack and the batteries will fit perfectly again.
R. S. Mason 11/14/2014