Security Camera Installation
I have wanted for a number of years to install cameras around my house, both for the security aspect and for my own ability to merely keep track of things. Until recently, price has been the barrier to this project. Recently a coupon book from Costco listed a Q-See 16 camera security DVR (Digital Video Recorder) with 8 high quality cameras for under $400 after reducing the price $300. I couldn't resist. I ordered the system and actually received it in time to do some of my time lapse video of the solar installation using my new cameras.
I am not going to disclose everything about this system as it is a "security system", but most of my installation details will not decrease the effectiveness in any way.
I am breaking this report into two sections: Wiring and Camera Installation. Obviously these subjects are intimately intertwined, but for clarity I separated them. Each section is in approximately chronological order, and there is a lot of overlap between the sections. Some of the newer photos appear before older ones to show the details using the best available picture.
Wiring and general layout
I initially went around my house and selected locations where I would like to place cameras. Some of these locations proved impractical either from the view I could obtain or just the physical location and the wiring needed. After some "adjusting" I came up with a workable layout.
This Q-See system is a fully wired system and needs a length of cable to run from each camera to the DVR. The cable actually has two sections: a shielded coaxial run of RG-59U and bonded right to it a pair of 18 gauge power wires. By sending the camera power along with the video cable, there is no worry about having to have a power source nearby each camera.
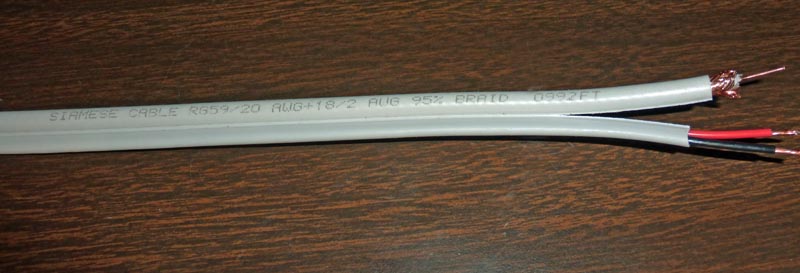
The wire I used is a siamese cable consisting of both the coaxial cable for the camera video,
and a two conductor power cable. Wire length measurements were made easy as the length
is printed on the cable every two feet. The piece in the photo was very near the beginning of the
1000 foot roll at 992 ft remaining.
After refining my layout I realized that most of the camera wires could be run mostly in the attics of the garage and the motorhome garage, but with a need to drop to under the house for the final run. I set about planning the wire routes with this in mind. I had two problem transitions. The first was running wires from the motorhome garage attic down to the garage attic. During construction I had a number of wires and a gas line that needed to make this transition, and they used up most of the available space in the one narrow wall that connects the two areas. The other problem was getting the wires from the garage attic down to the under house crawl space to complete the routing to the DVR.
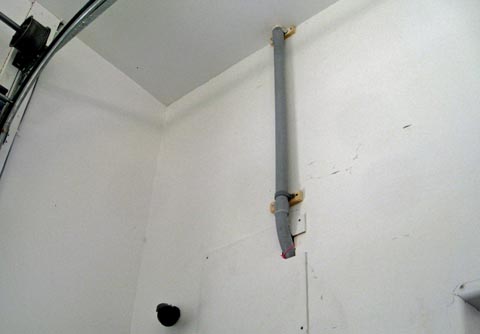
| I ran a 1 1/4 inch PVC conduit from the attic of the motorhome garage down to the attic of the car garage. In the upper attic, I extended the conduit to the edge of the crawl hole to avoid having to actually crawl. Access to the garage attic is through an access hole I made to run TV, Cat5, and phone cables. The pink string tied to the conduit is my "fish line", nylon cord to pull additional cables across the garage ceiling. | I ran a 1 1/2 inch EMT conduit from below the house into the garage attic. The water heater compartment was the only practical place to run this. |
Once
I had the two conduits in place I went under the house and ran four 3/4
inch PVC conduits into the wall near the DVR. I was originally
planning to extend the garage attic conduit all the way up into this
wall so I could fish the wires all the way without having to go under
the house, but there were two 2x6 joists directly under the wall.
I was able to angle the 3/4 inch conduit along side the joists and
enter the wall hollow. I will need to make several more trips
under the house to run wires before I am done.
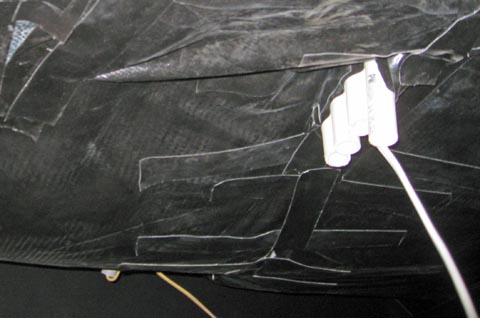
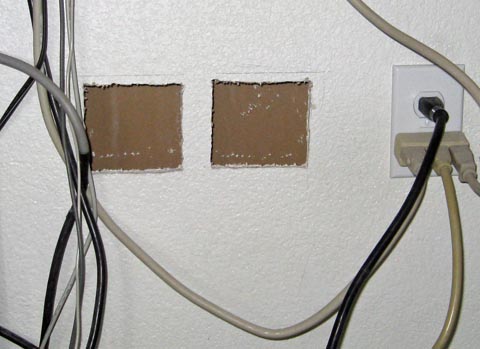
| These are the 4 conduits I ran into the wall near the DVR. This picture was taken after I had run the initial cable. | Near the DVR location, I cut openings in the wall for the camera connector plates. The 4 conduits end inside the wall below these cutouts. |
Before
starting to install the cameras for real, I installed one in the
garage. I fed the cable down the EMT conduit to under the
house. I then went under and finished routing that wire.
Using the lengths printed on the wire, I obtained the length of cable I
needed past the top of the conduit. To install the cameras, I
feed the wire up through the crawl hole to each camera. I then
mark where the cable meets the conduit, add my fixed length, and cut
off the cable using the printed lengths on the cable. I installed
the next 4 cameras before feeding those cables down the conduit.
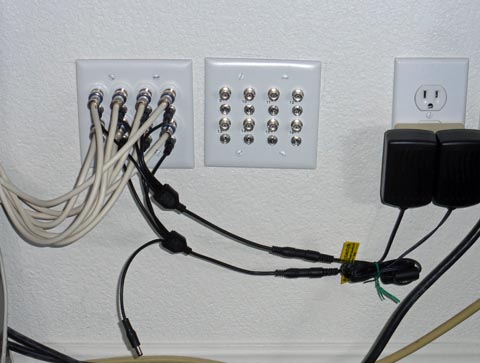
This is the finished installation of the connector plates. Currently all cameras and a
spare are connected on the the left plate, and the other spare on the right. BNC
cables connect between the camera wall plates and the DVR. The power is
supplied by two camera power supplies and two four way splitters.
The DVR has a 1 terrabyte hard drive. I currently record only
when motion in the image triggers it. Apparently they keep a
buffer going, as it starts the recording 5 seconds before the movement
and continues about a minute after it stops. At this rate, my
hard drive should be able to record for several months before
overwriting the oldest images.
I have had a couple of cameras fail in the night vision mode. The factory quickly replaced them, even paying for shipping both ways! Hopefully there will be no further problems.
I am very happy with the results and am still amazed at the power I received for the price. The installation has been quite a job, but I think the results justify it.
Addendum of 4/9/15 PTZ Cameras
I have really enjoyed having the surveillance system and use it a lot for just plain viewing what is happening around me as well as for the security functions. There are times I would really like to be able to hone into a specific area, but all my cameras are fixed both in the direction of view and in the magnification factor. There are a number of PTZ cameras available. That stands for Pan, Tilt, Zoom. These cameras do just that. you can control exactly where the camera points and the zoom factor of the lens to magnify a specific area if desired. The main problem with these cameras is they are expensive! The price range I have found for a minimum specification camera is about $300 to several thousand! That is why I haven't had one.
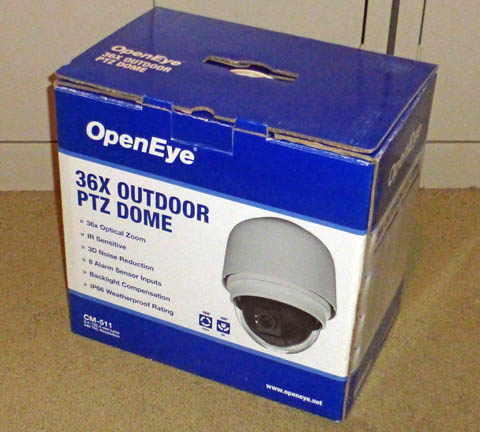
In looking around on Ebay, I found a very sophisticated PTZ camera on sale for $100. It was listed as factory refurbished. I looked up the model number and found it sold new for almost $3000!!! There are still vendors selling new ones for about $2700. I was somewhat dubious about the seller, but he had many, many different cameras from this specific vendor, so I took a chance. When it arrived it looked like brand new. It was in a factory box with all the accessories including manuals (3 of them), connection cable with all the mating connectors, and even small containers of special lubricant to use on the gaskets when assembling the parts.. The packing list had no company name, but did have an address and a building number. I cross checked and found it was the manufacturer's address. Apparently they are using Ebay to dispose of refurbished, out of date cameras. That's great for me!
A few of the specs on the camera are:
1 to 36x zoom ratio
360 degree panning continuously (no stops)
0 to 90 degree tilt (the center of the image can be from straight down to the horizon. Actually, it tilts 180 degrees with the image optionally flipping top to bottom on the way up the other side.
Many advanced features such as defining a number of points and zoom factors which the camera will cycle through and many, many internal camera parameters which the user can set using a
built in menu system.
It is rated to -49 degrees and contains a fan and a heater to maintain the proper temperatures and a clear lens in all weather conditions.
I checked it out and everything worked perfectly, so I ordered another one. It was not quite as nice with no manuals and no mating connectors, but it also worked perfectly.
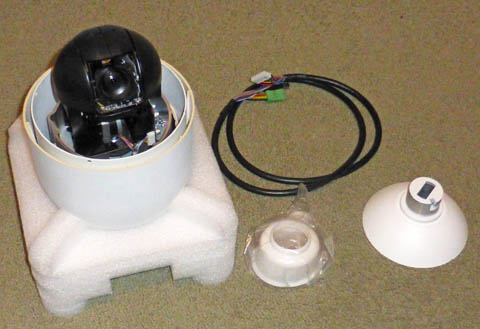
The cameras each came in a factory box with all the original packing. The silicon rubber shield, the connection cable, and the optical
dome which cover the camera (not shown here) all looked brand new.
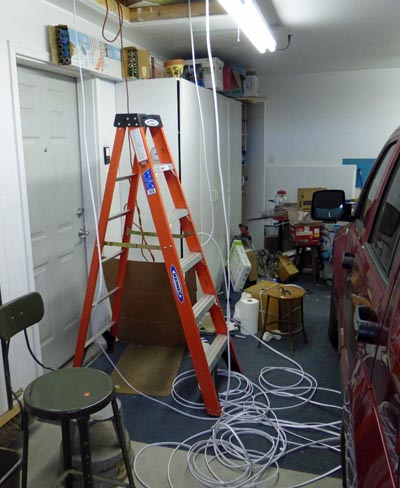
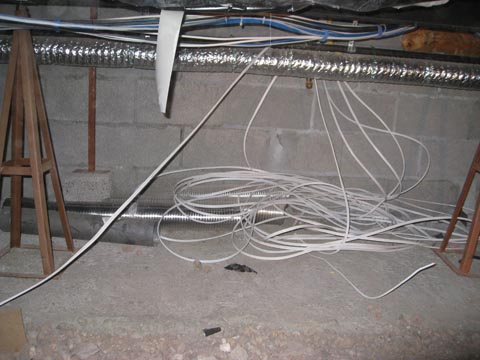
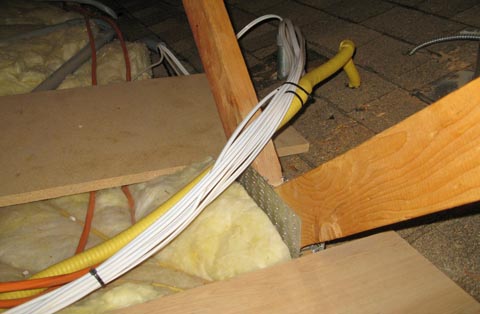
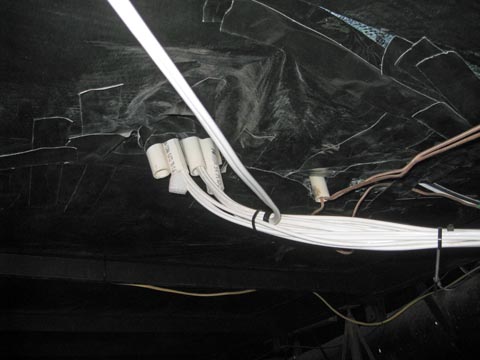
| This tangle of wires is what I get when I am ready to feed several down the conduit to under the house. I first run a cable from the crawl hole to the camera, then from the top of the conduit I add my pre-determined length. That is just the right length to reach my DVR. When I get several cables ready, I feed them down the conduit. | After feeding 4 cables down, this is what I saw. OK, I know it looks like 6 new cables. One of them snagged and created a loop. After dropping down the conduit, the cables all just zig zagged nicely in a pile waiting for me to route them. |
| In this attic shot, I have run 8 cables down to under the house. They consist of 6 cameras and two spares. The 7th camera comes in from the other side of the house. One spare comes down into my garage network, TV, and phone patch area, while I left the other in the garage attic for future use. | Here the bundle of cables from all 9 camera cables enters the conduits leading up to the connector plates. |
To
connect the cables to the DVR, I made two connector plates with the
video and power connectors mounted in them. The camera cables
solder to the back side, then the whole assembly is mounted to the
wall, with the excess cable looping up into the wall.
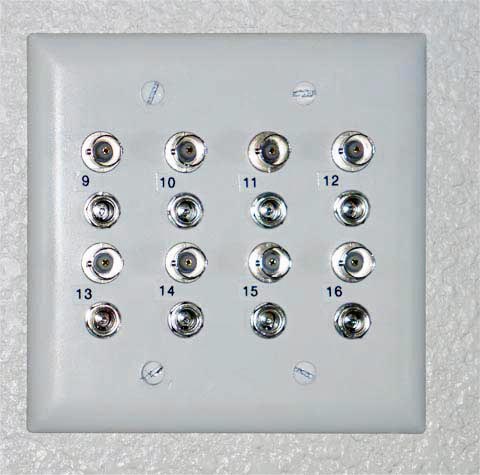
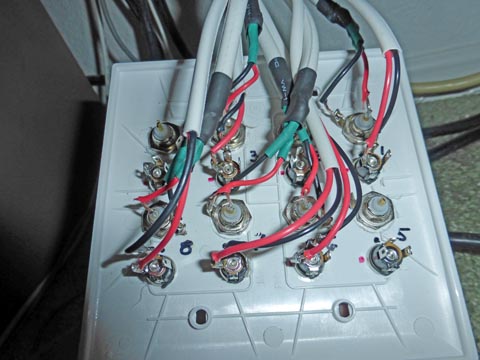
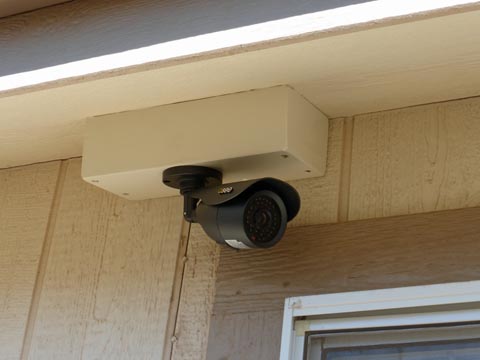
| This is one of the two plates I made to connect the cameras. I made plates to accommodate the full 16 camera capacity of the DVR, even though I only currently have 8 cameras. | I had to solder short pigtails to the coax to make it flexible enough to fit into the wall behind the plate. The power wires just solder to the power connectors. This photo shows the first 5 cameras installed (not consecutively numbered). |
This is the finished installation of the connector plates. Currently all cameras and a
spare are connected on the the left plate, and the other spare on the right. BNC
cables connect between the camera wall plates and the DVR. The power is
supplied by two camera power supplies and two four way splitters.
Camera Installation
I have installed seven cameras at this writing, a couple of them more than once. In most cases I tried to temporarily mount the camera near its final location and look at the results on a monitor. This operation caused several modifications before finally mounting the cameras. In a couple cases the final results still were not satisfactory and changes were made. This is all the cameras I currently plan on installing.
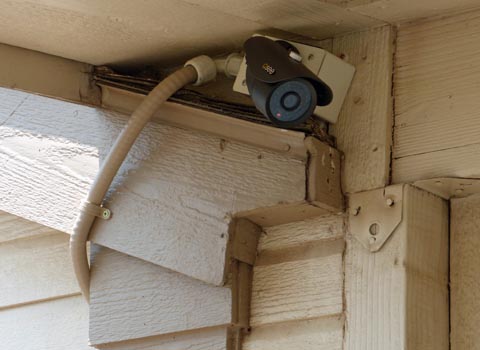
I did crawl into the motorhome garage attic to install this camera. I felt more comfortable
drilling the mounting holes and connecting the cables in the attic than on a 20 foot ladder.
I still needed the ladder to mount and aim the camera.
This camera provides me with my favorite view - a broad panorama of my driveways, my
street, the houses across the street from me, and even our nearby lake. I can watch my
neighbor's flag and judge the winds.
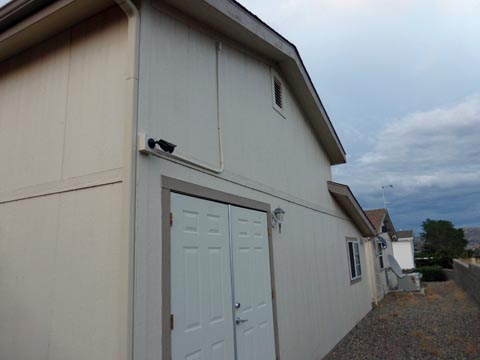
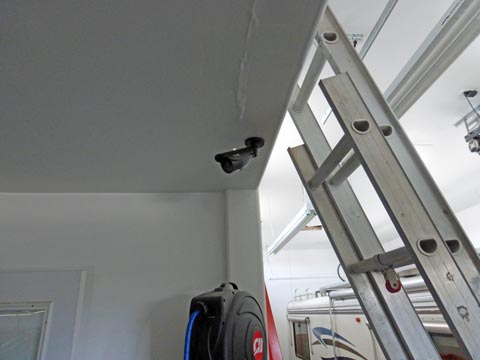
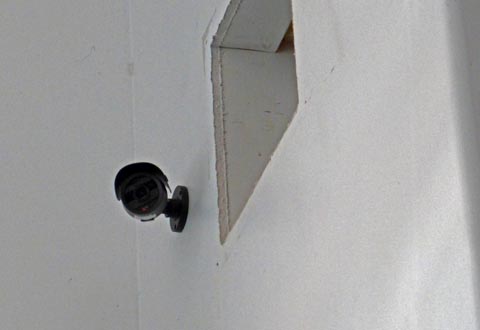
The final camera I mounted was on the rear corner of the motor home garage looking
down the rear of my home. This camera required by far the longest wire run at about
135 feet. The wire runs from the camera up to the M.H. garage attic, the full length of
the M.H. garage, down to and across the garage attic, then down under the house to the
DVR. I needed surface conduit to get from the camera up to the attic.
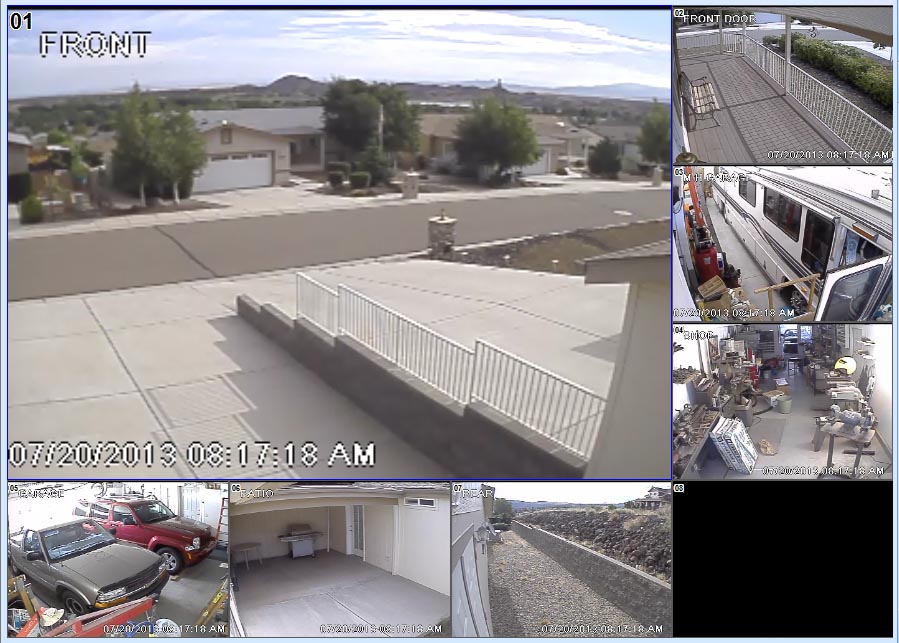
This is the view I see on my monitor. (It has higher resolution than I can show here.) I am able to receive these images live on any
of my computers, on any computer in the world via the Internet, and even on my cell phone and tablet. I have a variety of layouts
available to view the images. This is my favorite.
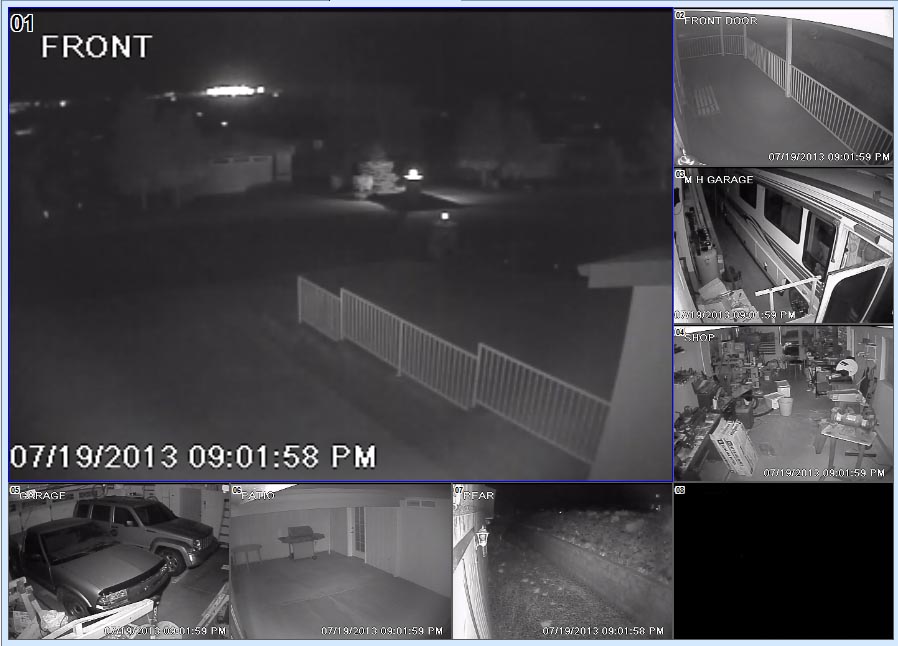
At night the cameras are amazing! The infrared LEDs illumnate the area so the cameras can see in total darkness.
I have installed seven cameras at this writing, a couple of them more than once. In most cases I tried to temporarily mount the camera near its final location and look at the results on a monitor. This operation caused several modifications before finally mounting the cameras. In a couple cases the final results still were not satisfactory and changes were made. This is all the cameras I currently plan on installing.
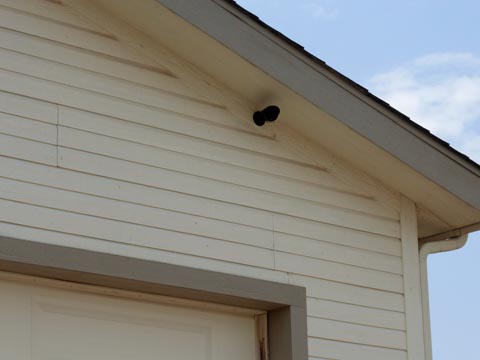
| The first camera I mounted was in the garage. I was able to drill directly into the garage attic and from the nearby crawl hole snag a string from that hole. I then pulled the cable using the string without having to actually enter the attic. I really love a set of fiberglass rods from Harbor Freight designed to fish wires. I can screw several lengths together and reach areas not possible by other means. There are ten 1 meter lengths available for a maximum length of about 33 feet. | Then I mounted the motorhome garage camera. I was able to mount it on the wall with the wires entering directly into the garage attic. Again, my fiberglass rods allowed me to run the wires the full width of the garage without climbing into the attic. The access hole to the garage attic is normally covered. |
I did crawl into the motorhome garage attic to install this camera. I felt more comfortable
drilling the mounting holes and connecting the cables in the attic than on a 20 foot ladder.
I still needed the ladder to mount and aim the camera.
This camera provides me with my favorite view - a broad panorama of my driveways, my
street, the houses across the street from me, and even our nearby lake. I can watch my
neighbor's flag and judge the winds.
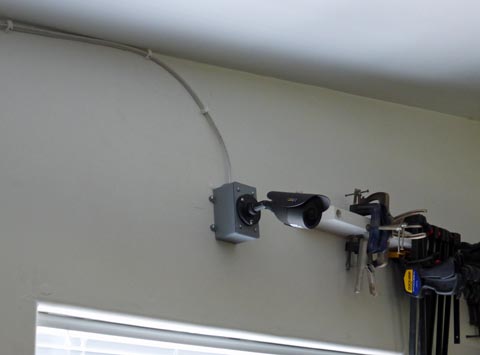
| I installed my shop camera and the patio camera as a pair. I decided
it would be OK to run the exposed cables around the edge of the ceiling
of my shop. The patio camera is on the outside of my shop wall, so its
cable comes in and joins the shop cable. They run along the ceiling
and through a wall into the garage attic. |
It took three tries of the patio camera to get it right. As I mounted
it here, it looks like it will work great. Unfortunately the fascia
board extends below the mounting surface and blocked the top of the
picture. It also was very brightly lit by the nighttime LEDs and
washed out the rest of the picture. |
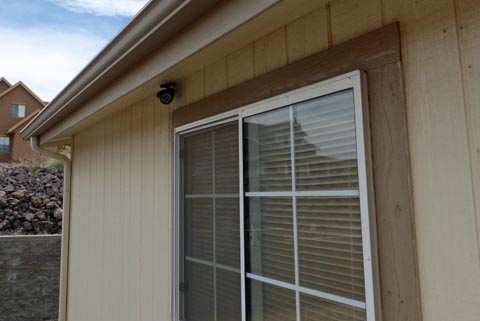
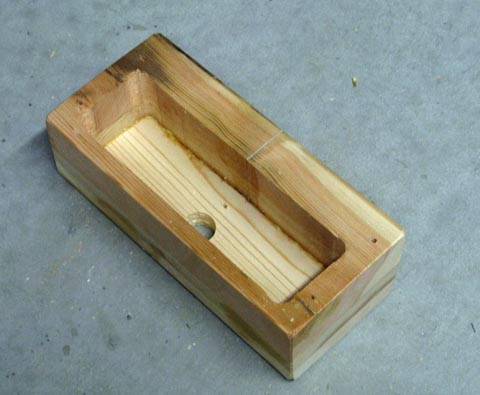
| I tried a couple of fixes for the patio camera. First I mounted
it on a block about 4 x 4 x 3. This dropped the camera below the
ledge, but the 3 inch longer hole in the center made it impossible to
position the camera wires and connectors into the soffit area. I
then made this block by gluing a 2 x 6 and a 1 x 6. I cut out the
opening for the wiring, then glued it to another 1 x 6. |
Here is the patio camera re-mounted. The block had plenty of space for
the camera wires and connectors, and it lowered the camera for a much
better view. |
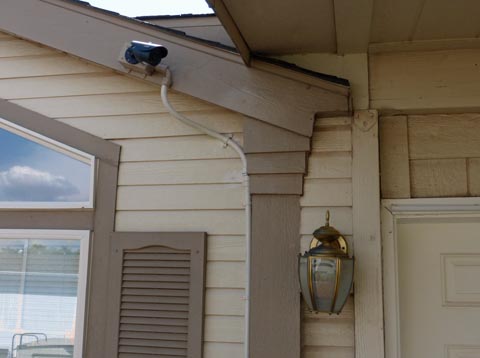
| The front door camera required a completely different wiring
approach, as it was on the other side of the house from the garages. I
mounted the camera in a very protected niche above the left side of the
front door. I then ran the wiring down the outside wall of the house
and under the deck, then over to my conduits. Unfortunately, this camera didn't work well at all. It was so close to the door it had to be pointed very steeply down to see the person at the door. This kept it from seeing people on the deck as they approach the door. |
I remounted the camera on the fascia board. It is not protected by any overhang, but gives a very good picture of people both standing at the door and approaching. The move was easy, as I just let the flexible conduit run the other direction without any rewiring. Of course now the light portions had to be painted dark, and the dark light! |
The final camera I mounted was on the rear corner of the motor home garage looking
down the rear of my home. This camera required by far the longest wire run at about
135 feet. The wire runs from the camera up to the M.H. garage attic, the full length of
the M.H. garage, down to and across the garage attic, then down under the house to the
DVR. I needed surface conduit to get from the camera up to the attic.
This is the view I see on my monitor. (It has higher resolution than I can show here.) I am able to receive these images live on any
of my computers, on any computer in the world via the Internet, and even on my cell phone and tablet. I have a variety of layouts
available to view the images. This is my favorite.
At night the cameras are amazing! The infrared LEDs illumnate the area so the cameras can see in total darkness.
I have had a couple of cameras fail in the night vision mode. The factory quickly replaced them, even paying for shipping both ways! Hopefully there will be no further problems.
I am very happy with the results and am still amazed at the power I received for the price. The installation has been quite a job, but I think the results justify it.
Addendum of 4/9/15 PTZ Cameras
I have really enjoyed having the surveillance system and use it a lot for just plain viewing what is happening around me as well as for the security functions. There are times I would really like to be able to hone into a specific area, but all my cameras are fixed both in the direction of view and in the magnification factor. There are a number of PTZ cameras available. That stands for Pan, Tilt, Zoom. These cameras do just that. you can control exactly where the camera points and the zoom factor of the lens to magnify a specific area if desired. The main problem with these cameras is they are expensive! The price range I have found for a minimum specification camera is about $300 to several thousand! That is why I haven't had one.
In looking around on Ebay, I found a very sophisticated PTZ camera on sale for $100. It was listed as factory refurbished. I looked up the model number and found it sold new for almost $3000!!! There are still vendors selling new ones for about $2700. I was somewhat dubious about the seller, but he had many, many different cameras from this specific vendor, so I took a chance. When it arrived it looked like brand new. It was in a factory box with all the accessories including manuals (3 of them), connection cable with all the mating connectors, and even small containers of special lubricant to use on the gaskets when assembling the parts.. The packing list had no company name, but did have an address and a building number. I cross checked and found it was the manufacturer's address. Apparently they are using Ebay to dispose of refurbished, out of date cameras. That's great for me!
A few of the specs on the camera are:
1 to 36x zoom ratio
360 degree panning continuously (no stops)
0 to 90 degree tilt (the center of the image can be from straight down to the horizon. Actually, it tilts 180 degrees with the image optionally flipping top to bottom on the way up the other side.
Many advanced features such as defining a number of points and zoom factors which the camera will cycle through and many, many internal camera parameters which the user can set using a
built in menu system.
It is rated to -49 degrees and contains a fan and a heater to maintain the proper temperatures and a clear lens in all weather conditions.
I checked it out and everything worked perfectly, so I ordered another one. It was not quite as nice with no manuals and no mating connectors, but it also worked perfectly.
The cameras each came in a factory box with all the original packing. The silicon rubber shield, the connection cable, and the optical
dome which cover the camera (not shown here) all looked brand new.
I
did a survey of various mounting locations on my house and initially
decided the the front end of the motorhome garage roof peak was the
best place. I then took a number of photos from that spot and
found that it didn't really show all I wanted to see. I then made
a quick mount for one of my digital cameras that I could hold on the
end of a 10 foot pipe and shoot remotely. Using this I did
surveys from several other roof locations and decided the best two places
were near the front and rear peaks of my house roof. I
concentrated on the rear mount first.
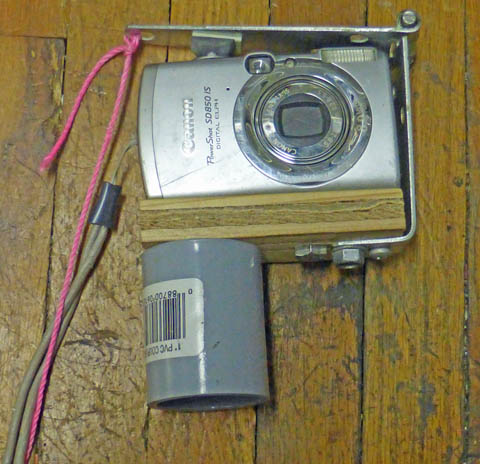
I made this quick mount for one of my cameras. It pushes onto the end of a 10 foot
length of 1 inch conduit and allows me to hold it high over my head. Pulling the pink
string takes a picture by pulling the hinge down and pressing the shutter button. I did
several panoramic rooftop 360 degree pictures this way, still standing on the ground.
It was very helpful deciding where to mount the PTZ cameras.
I built the mount for the rear PTZ camera first.
The mounting brackets were made in two parts. Here is the base mount which allowed
me to easily mount and align a light weight unit. The camera mount with the camera attached
is much heavier and just sets in place on this bracket. Slipping two bolts through aligned
holes holds it securely while tightening the nuts for the final mounting.
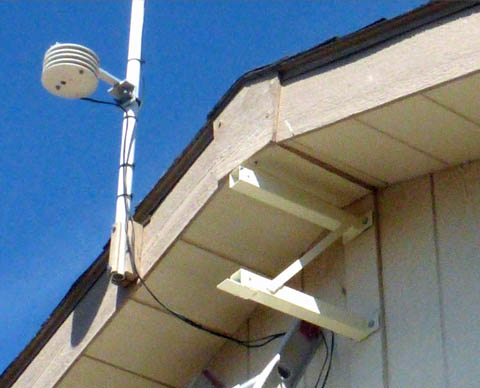
This picture shows the weather station mounting as it has been for many years. Unfortunately,
it will partially block the view of my solar panels after I mount the PTZ camera.

This is the camera mounting bracket. It is welded from 1 1/2 inch square tubing.
The camera mounting adapter fastens to the flange on the hooked end. The
electrical box is positioned to leave about 12 inches of cable in the box after
the camera is in place. Most of this slack is needed at the camera end to connect
the cable to the camera. The cable is then is pulled down into the box as the
camera is moved into position.
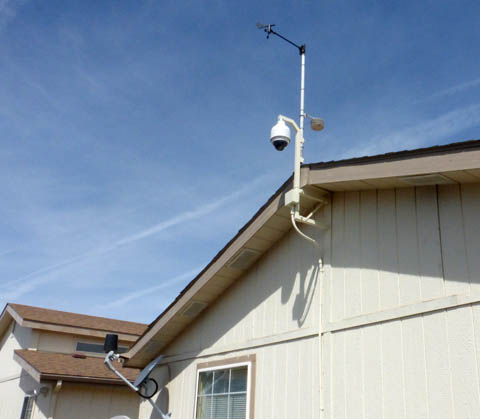
The camera is fully mounted and wired here. Flexible conduit connects to the electrical
box and leads to the wall, where straight conduit continues down to the bottom, and
through to under the house.
My weather instruments were moved to a mounting provision I made on the rear of
the camera mount. This was done partly to make a more stable and attractive mount,
and partly to eliminate the obstruction when viewing the solar panels.

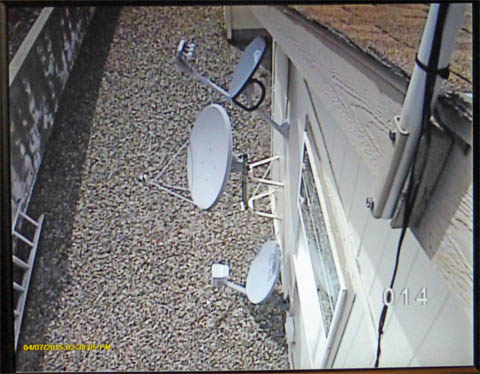
This camera now gives me the ability to view both my solar panels and my satellite dishes. This will help determine if I have snow problems
with either during the winter without trudging through the snow or climbing a ladder..
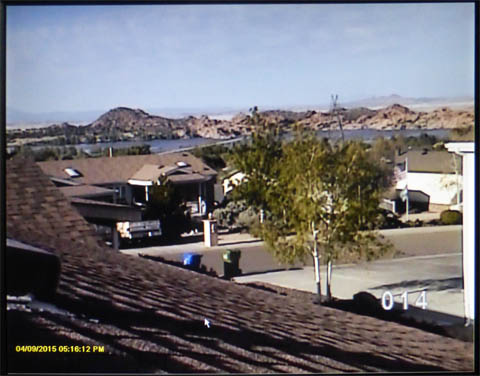
Looking towards the front of the house, I can see Willow Lake and a short length of our street.
\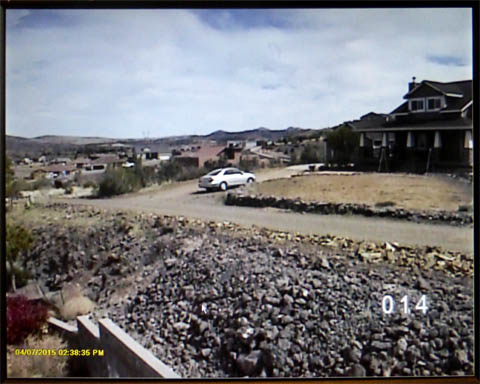
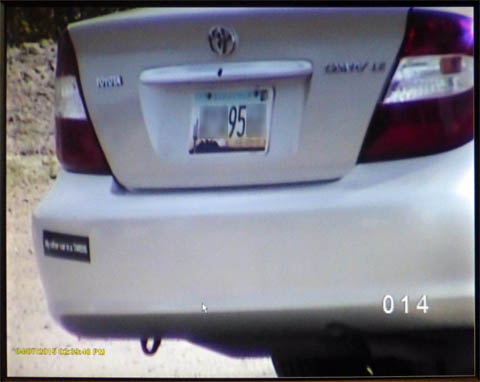
Looking to the rear of the house you can see a parked car in the driveway of a neighbor's house. By zooming in to a 36 power magnification, you can easily
read the license plate (mostly blurred here for privacy).
Note: These 5 pictures of the camera views were photographed from my security monitor screen.

The PTZ controller gives you total control of the camera. The joystick allows you to
point the camera where you desire and to set the zoom. The keyboard keys at the bottom
are a quick way to zoom in or out, manually set the focus (usually it autofocuses), or open
and close the aperture to lighten or darken the picture, overriding that automatic function.
The other keys allow programming specific points or setting up a "tour" which moves from
point to point on a programmable time sequence, and many other features of the camera.
I made this quick mount for one of my cameras. It pushes onto the end of a 10 foot
length of 1 inch conduit and allows me to hold it high over my head. Pulling the pink
string takes a picture by pulling the hinge down and pressing the shutter button. I did
several panoramic rooftop 360 degree pictures this way, still standing on the ground.
It was very helpful deciding where to mount the PTZ cameras.
I built the mount for the rear PTZ camera first.
The mounting brackets were made in two parts. Here is the base mount which allowed
me to easily mount and align a light weight unit. The camera mount with the camera attached
is much heavier and just sets in place on this bracket. Slipping two bolts through aligned
holes holds it securely while tightening the nuts for the final mounting.
This picture shows the weather station mounting as it has been for many years. Unfortunately,
it will partially block the view of my solar panels after I mount the PTZ camera.
This is the camera mounting bracket. It is welded from 1 1/2 inch square tubing.
The camera mounting adapter fastens to the flange on the hooked end. The
electrical box is positioned to leave about 12 inches of cable in the box after
the camera is in place. Most of this slack is needed at the camera end to connect
the cable to the camera. The cable is then is pulled down into the box as the
camera is moved into position.
The camera is fully mounted and wired here. Flexible conduit connects to the electrical
box and leads to the wall, where straight conduit continues down to the bottom, and
through to under the house.
My weather instruments were moved to a mounting provision I made on the rear of
the camera mount. This was done partly to make a more stable and attractive mount,
and partly to eliminate the obstruction when viewing the solar panels.
This camera now gives me the ability to view both my solar panels and my satellite dishes. This will help determine if I have snow problems
with either during the winter without trudging through the snow or climbing a ladder..
Looking towards the front of the house, I can see Willow Lake and a short length of our street.
\
Looking to the rear of the house you can see a parked car in the driveway of a neighbor's house. By zooming in to a 36 power magnification, you can easily
read the license plate (mostly blurred here for privacy).
Note: These 5 pictures of the camera views were photographed from my security monitor screen.
My
security DVR system has provisions for the PTZ cameras, but is quite
awkward to use. You need to use the mouse to click on arrow
symbols to move the camera and on other icons to zoom. I purchased a
low cost PTZ controller from Ebay. This gives me joystick
control of the camera directions. If you move the stick a small
amount it pans or tilts slowly. If you move it more, the
movement is faster. By twisting the joystick knob, the camera
zooms in or out. There is also a full keyboard for sending
commands to the camera and a display to show the selected camera and
its settings.
The PTZ controller gives you total control of the camera. The joystick allows you to
point the camera where you desire and to set the zoom. The keyboard keys at the bottom
are a quick way to zoom in or out, manually set the focus (usually it autofocuses), or open
and close the aperture to lighten or darken the picture, overriding that automatic function.
The other keys allow programming specific points or setting up a "tour" which moves from
point to point on a programmable time sequence, and many other features of the camera.
R. S. Mason 7/3/2013