Hi all,
Betty and I had a wonderful time with the Ramblin' Recs RV group from the Escondido 1st United Methodist Church. We camped 4 nights at Agua Caliente County Park just South of the Anza Borrego State Park. The weather was gorgeous, and the fellowship with our friends was wonderful! We then spent several days in Escondido where Betty had several appointments.
We left Escondido on Monday, Feb 3 around 4:30 PM immediately after Betty's last appointment. We spent the night in the Flying J truck stop in Thousand Palms, leaving there at 5 AM Tuesday. We were home before noon.
While we were gone a lot happened on our house. The front deck was framed, planked, the roof was built, and the roof was paneled. The balance of the siding was installed on the garages and shop. The roof was installed on the garages, shop, and back patio.
I was a little disappointed that although the roof had been done, the Sola-tubes had not been installed in the hallway and utility room. Then, shortly after we returned, the head of the roofing company came by and asked me to show him exactly what I wanted and where to put them. He was going out of town until Monday, so asked if I would like another team to install them, or if I wanted to wait. I want the "first team" to do it, so am happy to wait a few days.
Sunday, Feb. 9
I have been working many hours every day since returning doing the
rough electrical wiring.
I have now completed installing all the wiring (except the panels and their feeds) in the RV garage, my shop, and the garage. It has been a major chore. I installed about 1400 feet of 12 gauge romex (2 and 3 conductor), about 100 feet of 10 gauge 3 wire, and 80 feet of 6 gauge 3 wire romex. I also strung over 200 feet of bell wire for the garage door controls.
While wiring the shop I was questioning my decision to have the ceiling slope like the roof. I figured it would give me more "space" with the higher ceiling. What I didn't count on was that by putting the ceiling on the bottom of the roof joists, every wire needed to pass through drilled holes everywhere! There is no open space in the trusses (no trusses) as in the garages. There are a lot of wires in the shop, therefore a lot of holes in the wall studs, top plates, and ceiling joists! They all got drilled, and the wires all got strung. The ground wires have been connected in all boxes with more than one cable, and the neutrals have been connected in all the switch boxes. I don't know how to get any more ready. The electrician is meeting me at the house tomorrow morning.
In an estimated two to three hundred 7/8 diameter holes I drilled, I hit one nail. In about a dozen 1 1/2 in. diameter holes, I hit 3!
The larger holes were for my various runs of 1 inch conduit running from the patch panel area in the garage to the shop and RV garage. There are also a couple that will serve both sides of the wall between the RV garage and the shop and the garage. This conduit allows me to string TV, phone, computer network wires, and anything else that may be developed in the coming years throughout the area. I changed my plans on this conduit. I had been going to run several dedicated runs from the patch panel to selected locations. One of the problems I encountered was the much higher RV garage ceiling. To get the conduit to the far RV garage wall would require too many bends to be able to fish the wire later. I ended up running one dedicated run to the near corner of my shop. I ran another run to the wall between the garage and the RV garage. In the same area I ran a short length straight down that will be available to both the garages. Also from that area I ran one up and over part of the RV garage ceiling to an area near the center of the building. From that same area I ran one over and down the wall near the RV utilities and another one to the back of the RV / shop wall for access from either room. I will have a removable cover over each common area so I can fish wires from almost anywhere to anywhere.
As we have no power to the site yet, doing some of the drilling and sawing was a challenge. I drilled the majority of the 7/8 holes with my Black and Decker 18 volt "Firestorm" drill David gave me. It will drill through about 3 feet of wood (about 24 thicknesses of 2 inch lumber) on a battery charge, and I have two batteries. Several days I started recharging the first battery when it was used up using a small inverter and my emergency car starter pack, which is a portable case with a battery and jumper cables. I often had most of a 3 hour charge in by the time the second battery was discharged. The other thing I did quite a bit of for my sabre saw and an AC electric drill was to use the same battery pack and a 750 watt inverter, newly bought from Home Depot. This setup worked beautifully, and even with fairly heavy use several days, I never discharged the battery to where it stopped working. This setup was invaluable for the 1 1/2 dia. holes. My B & D drill would die after about 2 thicknesses of wood. The AC drill had more power and just kept spinning! (It would shut down briefly if I overloaded it, which happened often!).)
The electrician is meeting me at the house first thing tomorrow morning. We will be installing the sub-panel in the corner of my shop. I have wires hanging down where it will go that will utilize 16 additional circuits.
Monday, Feb. 10
I went to the house a little before 8 and found no electrician yet.
I took the opportunity to sweep the shop and garage floors. I had
a sizeable pile of debris in the center of each when I finished.
Saturday, Steve's crew of 4 men came over and cleaned up most of the areas.
The living room was still full (almost literally) of debris left from cutting
down the two stub walls and the associated drywalling. It was really
a mess! There was also junk all around the house and garages from
the siding and roofing operations. Both driveways were piled with
debris. They worked for well over an hour carrying everything to
a large pile of construction scrap on the empty lot next door. When
I saw one of the workers using a piece of scrap board to try to clean the
floor, I loaned him my push broom. I got a MUCH better job that way.
When they finished, all the outside areas were clean, the motorhome garage
was spotless, and the house was wonderfully clean. They ran out of
time before getting to the garage and shop. That's why I swept them.
Just as I finished sweeping, up pulled a truck with Rodney, Sonny's associate. We discussed what needed doing. First was the running of the largest romex cable I have seen. It was 0 gauge, 3 wire with ground aluminum cable. Being a romex type cable, no conduit was needed. We planned the route from the main panel to the location of the about-to-be-added sub-panel in my shop. It required drilling 2 more 1 1/2 dia. holes, each through about 3 inches of wood. This size hole is not fun to drill, nor is it very fast. You have to keep just the right amount of pressure on the drill to keep sawdust coming. A little too little pressure and the drill just burnishes the wood, a little too much and it either stalls the drill or shuts down the electrical drive. You then have to turn off the drill and then on again.
I got the holes in about as well as any of the large holes I have drilled.
Then we looked at getting another run of the cable from the main panel to the house sub-panel. These are only a few feet apart. The main is on the outside of the front wall of the garage, and the house panel is just around the corner on the inside wall of the garage (outside wall of the house). We looked at running around the corner in the wall to the house panel. We cut out a 1 foot by 3 foot section of outer wall panel. There were a couple of studs to go through, plus a massive nailed together collection of lumber in the corner. It really looked impossible! We then looked at running the cable up and over. If we could get through the top plate over the house panel, through at least 3 thicknesses of 2 inch lumber and then through the house roof (now under the garage roof), we could do it. After removing an area of shingles, and managing to remove a section of metal edge trim (with almost no room to work), I was able to get a 1 1/2 in hole up through the roof. The rest was easy!
Rodney cut a hole in the shop wall and installed the new panel. Again, I am glad I was there, as he was all ready to install it facing the RV garage instead of the shop.
About this time, Sonny arrived. He checked out all my wiring. He would start at a receptacle, trace the wire to the next one, possibly asking me what fed the circuit, etc. As he was going through the wiring, he pointed out a problem I had. I had wired three of the outdoor light switches to get their power from nearby outlets. You are not allowed to have any lights on a GFCI circuit, which all the outlets are. He also pointed out that the boxes along the edge of the garage door needed to be spaced out on an added 2 x 4 to allow enough space for the dry wall edging. It took me about an hour to make all these corrections. I was done before Rodney finished wiring the panel.
I asked Sonny when he wanted to be back, and how much more he would allow me to do. He thought for a moment and said I could do the rest, and that he would only come back if I called him for help with a problem. He then made a comment that I took as a compliment. He said that when I had expressed a desire to do the wiring myself, he expected it would be a catastrophe, and that he would have to come in and straighten it all out! He was very pleased with what he saw. I felt very good.
Something else he said made me feel VERY good! He said I probably saved $3000 by doing my own wiring! It won't be that much, of course, even if he reduces his charges by that amount, as I have bought quite a few supplies, with more to come.
I am very impressed with Rodney, and I told him so. Of all the
trades that have been working around our place, he is the first (and only)
one to attempt to clean up his mess. As he was about to start cleaning,
I told him to go on to his next job (across the street) and that I would
clean up the debris
.
Shortly after the electricians left, Steve's crew showed up in the
dump truck. They were loading the pile from Saturday's cleanup to
take to the dump. I grabbed my broom and quickly swept the mess from
the panel installation and most of the sawdust I generated since Saturday's
cleanup. After loading the pile into the truck, they got the trash
from the shop and the garage. It feels so much better being clean!
The rough electrical inspection is tomorrow!
Tuesday, Feb. 11
When we first returned from our campout and trip to Escondido, the
carpentry crew had almost completed the front deck, including all the ceiling
except around the eves. One omission I noted was that there was no
light fixture in the ceiling. I then discovered that one is not standard.
They were just about to close in these last areas, so I talked to their
boss, asking for a little time. He assigned them to do several other
tasks first. I was able to cut a hole in the ceiling for the electrical
box, fish a wire to the eves, drill through the rafters along the side
of the deck, then back up along the rear edge to the house where the wall
mounted porch light is. After some head scratching, drilling of intersecting
holes, probing, and a certain amount of luck, I fished the wire into the
hole from where I had just removed the porch light box. I could now
install a new box, connect the wires and both lights would operate with
the same switch. Looking at the old porch light, I noticed that it
was now located tightly between an original decorative column on the house
and a new 4 x 4 deck roof support. I decided I would build a small
box from extra siding material that would mount this light flush with the
outside of these two posts, and left the wires hanging until then.
I woke up at about 5 AM this morning with the horrible realization that I had not installed a box there, and that the wires were still hanging from the wall! I left for the house at about 7:30, shortly after dawn, and installed a (temporary) box. Whew!
We had an appointment to meet with Tim Lusk, the head pastor at the Prescott United Methodist Church here at 9:30 this morning prior to our joining the church this coming weekend, so I had to get back.
Later, Betty and I headed for Costco to get some supplies, swinging by the house on our way. There was no evidence of the inspector having been there. After doing our shopping and having lunch, we swung back by the house on our way home, still nothing!
I called Steve about 4 PM and he said the electrical had passed!!!! Yesssss! There were a couple of framing details that needed doing, such as adding metal straps in a couple of locations. The doors and windows are supposed to have been delivered today and will be installed shortly, then the insulation and drywall can commence.
I hope to have a couple days of "easy work" to allow my wounds to heal. I counted 10 nicks, cuts, and scratches on my left hand and 11 on my right! (I must be ambidextrous.) I really hate nails that protrude from a wall where there is no logical reason for a long nail to have been used! I have been caught by many, mostly while pulling wire through the various holes along the walls and ceilings.
Wednesday, Feb. 12
I headed over to the house this morning to do some minor tasks.
I was thrilled when the roofing crew arrived to finish the roof over the
front deck and along the ridge line of the house. A major storm is
due by this evening!
My major task was to cut about 50 pieces of cardboard the right sizes to fit the various electrical boxes. I put one in each box to protect the inside of the box and the wires from the drywall mud and the paint which follows. I really hate encapsulated and painted wires!
While I had the big ladder out, I added one box 2 feet farther from the front of the RV garage and ran a short length of romex to it for the door opener. I also moved the box containing the control wires. I had decided that I had placed these too close to the front for where the door opener will be located.
The roofer's boss said the Solar tubes will be installed on Friday (I'll bet they are not, as it is supposed to be raining through Friday.). As these will be in shortly, I am delaying installing the inside switches until I get the additional light.
I went home about noon so Betty and I could go out and select the stone to cover the mailbox. We may also use the same type stone to cover the stucco areas on the front of the garages and house at a later time. We found the company that Steve buys the manufactured stone products from. They have an extensive set of displays of at least 30 or 40 different patterns, each covering a large panel. These panels surrounded a large part of their parking lot. We selected a pattern about the time a fairly strong cold wind came up.
Next we went to Foxworth Galbraith, the local lumber company and looked at locksets. We need 6 sets of locks for the 3 new doors and to replace all the exterior locks in the house. The house has lever door handles throughout the interior, but the outside doors all use smooth knobs. Also between the three locksets and the three deadbolts, they use 5 different keys! Our replacements and the new locks will all use the same key. We tentatively selected a design, but needed to head back to the house to verify the shape of the existing levers. Also it seems that there are two standards for the lock setback: 2 3/8 and 2 3/4. I verified that the existing ones are 2 3/8, but need to wait for the new doors to verify they are the same setback. Nothing is easy!
Tonight we went with the Wilkisons to the Dry Gulch Steak House to celebrate Betty Wilkison's birthday. Happy birthday Betty!
Thursday, Feb. 13
We had over 2 inches of rain last night! The rain is forecast
to last through Friday. I took my time getting started today, but
headed for Home Depot around 10. I looked at the various options
to use for a "cat-walk" crawling surface to put in the two garage attics.
I had considered one or two widths of 1 x 12. When I found that an
8 foot length was almost $18, I kept looking. I ended up using 15
inch wide 3/4 thick particle board book shelf stock. At $6 for an
8 foot length, it was somewhat more affordable, and the 15 inch width provides
ample crawl width. When I got to the house with my materials, a couple
of Steve's workers were installing insulation in the garage. Fortunately,
they had only done the rear half of the ceiling, and it made sense to put
the cat-walk in the front half.
As soon as the workers saw what I was doing, one of them crawled up in the trusses and helped locate the boards. It only took about 10 minutes to place the garage boards. As soon as they discovered I was putting the rest of the boards in the attic of the RV garage, two of them went in the house and came out with my 12 foot stepladder. Before I knew what was happening, Felix had crawled up into the trusses (16 feet up!). With David holding the ladder, and Felix in the trusses, it was a simple matter for me to bring the boards one at a time, climb up the ladder with them and hand them up to Felix. I would then climb up and drive screws into the trusses to secure the boards. In about 30 minutes this cat-walk was installed. As I was preparing to leave, a truck pulled up with the doors and some of the windows. After unloading them, I measured the setback of the lockset holes, they are also 2 3/8. I can now order the locksets. On my way home, I went by Foxworth Galbraith and did just that. They should be in Monday.
Friday, Feb. 14
Happy Valentine's Day!
I headed out to the house this morning fairly late. When I got there, Scotty's (the framer) truck and the construction trailer were in front of the house. After a while, Scotty and his boss, Robert showed up with a truckful of lumber. They are building the landing in the rear of the RV garage today.
While Scotty built the landing and stairs to it, I started tearing out wood where the front deck joined to the house. The facia board and boxed-in roof overhang had been cut at the edge of the porch with just a simple trim piece nailed in to close it off. It was really ugly. Also, after adding a 4 x 4 post to support the deck structure, the front door light was buried between two posts. I removed a lot of the pieces that really did not belong, and replaced them with a piece of siding material that bridged the gap between the two posts. A couple of small pieces closed in the top and bottom. I mounted the electrical box in the new piece of siding which is flush with the front of the posts. I think it looks much better and will certainly provide more light when the fixture is mounted.
Sometime since yesterday late afternoon and now, the two shop windows showed up. The 3 side windows for the RV garage are still missing. Scotty is scheduled to come Sunday (to make up for a couple days off this week) to install doors and windows.
They installed a 2 foot long 1/4 inch steel strap on the west front of the RV garage this afternoon. It ties the concrete filled blocks securely to the wooden structure above. The inspector is coming again Monday to buy off the added straps on the shop rafters and this front tie-down strap. Hopefully drywall can then be done.
Saturday, Feb. 15
Not much was happening today. I went to the house and took some
measurements and added a wire for the thermostat for a heater I may install
in the RV garage,
Yesterday I was talking to Tom, one of Steve's foremen and mentioned that I had screwed the cat-walk down to each truss. He asked if I checked the dimensions from truss to truss before doing that. (I had not.) During drywalling, they quite often pull the trusses to align to the edge of the drywall. I have effectively blocked that ability. I found I could set my 12 foot stepladder on the new landing, with the top of the ladder actually extending just above the ceiling. I took my drill, tape measure and a pocketful of screws up to the attic. Starting at one end, I measured the distance between spans. A couple were off by over an inch, with larger cumulative errors. One truss at a time, I removed any screws, flexed the truss to the correct spacing, and re-screwed it. When I finished, all were set at 24 inches within 1/8 inch, both center to center and cumulative. The drywall should now align OK.
It has been sunny today, the rain ended last night. We had about 2.6 inches the last 3 days. Even though it is clear, there is a lot of mud. It will take several days for that to dry out.
Enough for this edition.
I have posted photos on-line at:
http://members.isp01.net/rmason/statusreports.html
Till next time,
Dick
 |
| The front siding for the garages is now in place. It really makes
them look almost finished.
----- |
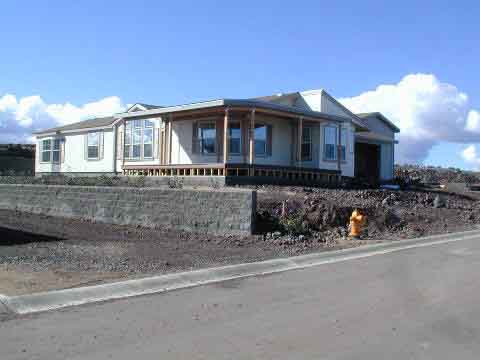 |
| The front deck is nearly finished.
----- |
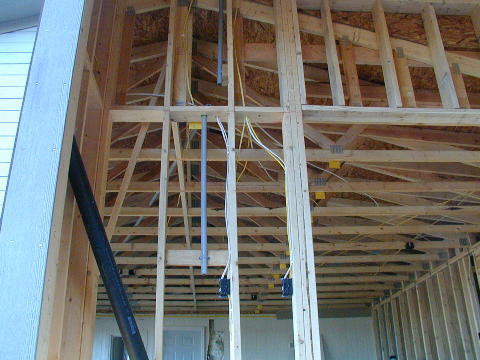 |
| Looking from the RV garage to the car garage, you can see several runs
of conduit and most of the garage wiring.
----- |
 |
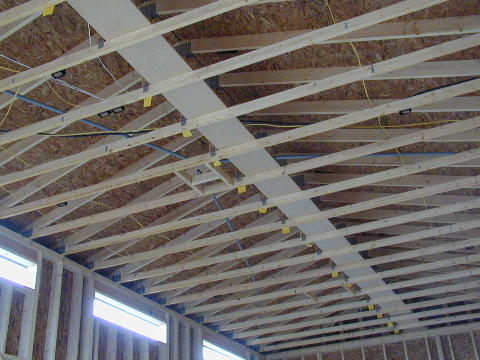
| The cat-walk has been installed in the RV garage.
----- |
 |
| The clerestory windows which face out over the shop roof are shown
here.
----- |
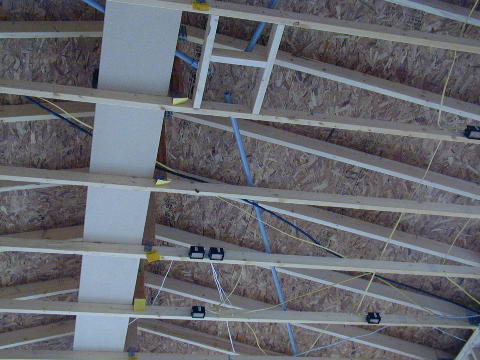 |
| The junction area for the RV garage conduits is in the ceiling.
----- |
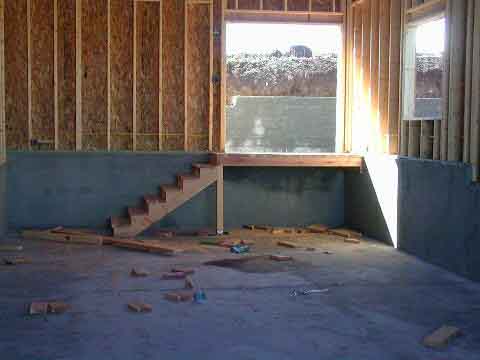 |
| Scotty finished building the landing in several hours. The railings
will be the wrought iron type used throughout the subdivision.
----- |
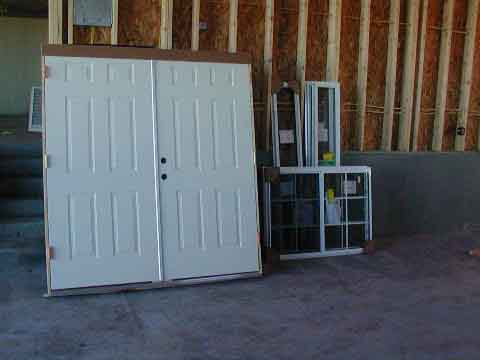 |
| The doors and some of the windows have been delivered.
----- |
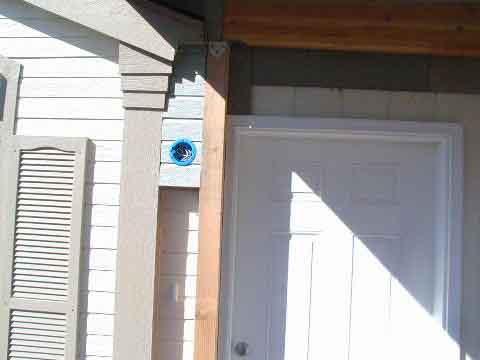 |
| I spent almost as long building this box to move the porch light out
from between the posts as it took Scotty to build the landing.
----- |
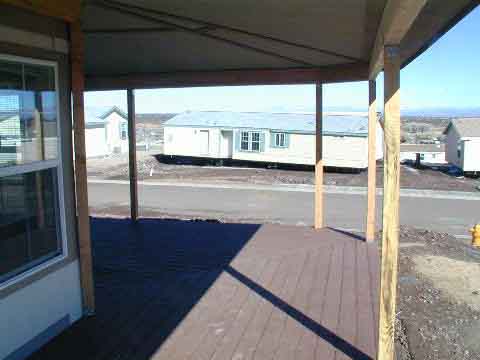 |
| Our front deck is quite spacious! This is looking from about
the front door. the deck continues around the front corner of the
house.
----- |